Sunday, November 30, 2008

Clamp and Hold


Alright! It was glue-up time for the box this week. First "calls" had to be made. These blocks are what the clamps actually contact. To be able to get a perpendicular face so the clamps could, well clamp, without moving the force up or down the calls had to be made to mate the outside curve on one face and then have a 90 degree flat on the other. This was actually easier than it sounds. I grabed the chopping block I made for the project and cut it into for equal sections. Add some padding shaped to surround the joinery and they were done.


Before the glue up could actually happen pre-finishing needed to happen. Pre-finishing covers the parts that could not be done or difficult to do after the assembly. In this case the inside faces and the bottom panel were treated with shop mixed shellac and a bit of wax.


The assembly. It's always an exciting yet nerve-racking time. The time that all your hard work brings the components home and hopefully you haven't mislabeled or misjudged something. Once put together assemblies are more often then not impossible to correct.
The count-down to the unclamping is sometimes anxious, waiting to see what comes out. Other times it just rolls by in confidence.
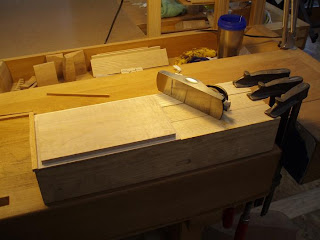

Moving on. Here is the rough cut panel for the lid of the box. My eye caught a small plank of curly western maple. The colors was what first got my attention opposed to the curl. It had pink undertones with greyish blue streaks and deeper pink washes. I set up this little rig so that I could round over the sides without diving into my bench. I also had taken care to straighten out the grain the best I could so I could plane this piece in both directions. This little piece came from a cut that was about 15" long and 2" thick! But the end product is worth it!


I was amazed to find out that this log had been picked up off one of the local beaches! Money may not grow on trees but sometimes things even better can be swept up beneath your feet.

Sunday, November 23, 2008

Phew...


This week was Tail Week. With the pins of the dovetails complete it was time to scribe the pins to the tail stock. These curved side present many problem solving challenges along the way and this was another one. I could use my vises or even my chopping block to hold the pieces so this is what I did. I had to shape the ends of the pins to match the inside curve of the tail stock. Stood them upright at 90 degrees and put a weight across them to keep them in place. Since you're only using what force it takes to draw a line with a pencil the stability of the scribe set-up doesn't need to be rock solid.

I kept my side pieces extra long because I knew this was going to be a difficult joint and I wanted to nail it as best as I could... which means multiple tries, though once you get the front 2 you don't have 2nd chances on the back ones. 4 cautious days and 9 sets of tails later I put down my chisels and took a big sigh of relief. Finished with the tapered curved dovetails!


Time to move on! I now needed to put a groove in the bottom for a panel and a rebate in the top for a nice little recess for the lid to settle in. I re-sawed my chopping block to use as a "cradle" to use the shaper and get 90 degree cuts.


Here is a photo of the box carcass with the pins cut down and the rebate prepared. If you're thinking that it looks kind of dirty, you'd be right. All the handling from making the joints left it a little gray. This Arbutus is pretty good at showing dirt, but don't fear it will get cleaned up and a coat or two of wax will keep it that way.

Sunday, November 16, 2008

On a Curve


This week continued work on box wall prep. Pictured above is rough shaping to the outside of the box sides. I started out taking heavier shavings with my smooth plane and as I got close to the shape desired I backed off the cuts little by little to smooth out the major facets.


Here is the part I've been working for. Finally getting the sides to shape I can get into the major joiner of the piece... the tapperd-curved dovetails!


Taking my time to get it right it took me 2 days to mark, saw, chop, and pare the pins. Although the pins need to be well prepared for the tails to meet properly, the pins are the "easy" part. Getting a tight fit with tails to meet each corner is going to be a challenge especially knowing that I have a limited amount of material that took a lot of work to get them, well workable for this project.
I hope to have the completed set of joints done by the end of the week. The I can get back into the creative side and more thoroughly mock up a lid. Also i will be faced with some problem solving to figure out how to get the various procedures done on the curved sides to except a bottom panel and the lid.

Sunday, November 9, 2008

Mill lumber - check.


At the beginning of the week I cut into the plank of Arbutus I had set aside for the box. I mentioned last week how I was aiming at a section with great color in it. It was difficult to get the size of material with grain graphics that worked. There are a number of small knots and defects that seemed to be spaced just a little too close together to get what I wanted. I found one section to looked like it would work. Well, when I opened it up I found a crack in the middle of what I needed!
I was crushed. There is no where else in the plank that I could get that color. I took off for a bit and came back too it to have another look. There was one other relatively clear section that was lighter and more constant in color but got just a little lighter towards one side that also exhibited a subtle curl figure. That is now what I am working with!
Above is a line-up of planes and irons to be sharpened, all of which I'll need on this small box. From left to right they are: block plane, smooth plane, jointer plane, 1 1/2" coopering plane, 1 1/4" coopering plane.


Here is the "roughing out" of the inside curve of the box walls.


This is one of the most technically important procedure of the box, refining the inside curve. The inside wall of the side is the base of the joinery. I have made a curved chopping block and a cradle to hold the work piece that match this curve. Everything needs to match the same curve for the joints to be successful.
Probably the most accurate way to check a surface is a simple one. Light. If there is a deviation of even 0.001" one can see it with a straight-edge or template with light at the "horizon" of the measured piece.


Though some wood has been milled, it has only been for the box "carcass" I had a piece of Plum in mind for the bottom panel but it is now being used by another student. I searched the whole inventory and found this interesting piece. No one seems to know what it is. This board plus 3 more of it's kind were sold to the school by a woman said it was part of a crate! It is a hard wood, the grain structure looks similar to Kwila though it's not as brittle. It feels a bit like Hickory and exhibits striping that looks similar to some streaking found in Hickory as well though not the same colors. This plank is has colors of blond, pink undertones, and dark brown stripes with a seeming purple hue. I think it will create a nice contrast while maintaining the "temperature" of the piece.

Sunday, November 2, 2008

Mock Up Begins


Ready to dive into projects for the Inside Passage's December show I've started mocking up a small box. It will be some where around 11" x 7 1/2" and will likely be an open cavity with a hinged lid. Though is seems minimalistic it incorporates some very challenging joinery.


The "design" of the box is curved inside and out on all four sides with graduated dovetails on these tapered curves at the corners. The order of operations and aids needed to accurately map the joints I believe is the toughest part. I am currently half way through a sort of "proof of concept" set of joints. I am hoping that it all works out!


The box will be made of a wood/tree native to the Northwest, Arbutus. It's a fantastic looking tree. Being from Minneapolis, MN I have never seen one before. The trees stand out so much from the other local trees here with it's sweeping curved trunk and branches, it's rust colored bark that peels like paper to reveal a vibrant green behind.


Arbutus, also known as Madrone, is a non-commercial tree meaning that they are protected from harvest for commercial use. The Arbutus lumber here was locally felled and air-dried before being put in a dehumidifier kiln to get it to a working moisture content. The plank I have chosen has some great color in it that I hope to take advantage of in the composure of the box.
This lumber is great to work with. It has a very nice structure some where between that of hard maple and pear wood. It's a joy to hand plane and is relatively easy on tools. These are welcome qualities for a personally challenging piece!