Monday, March 25, 2013

Combo Amp Stand Continues

  Continuing the Amp Stand. I'm shaping the end grain "terminals" a bit. I'm giving them a subtle three dimensional rounding. It will soften the overall appearance of the otherwise straight lined piece.

I've got the substrate set up, time to get those veneers in line.

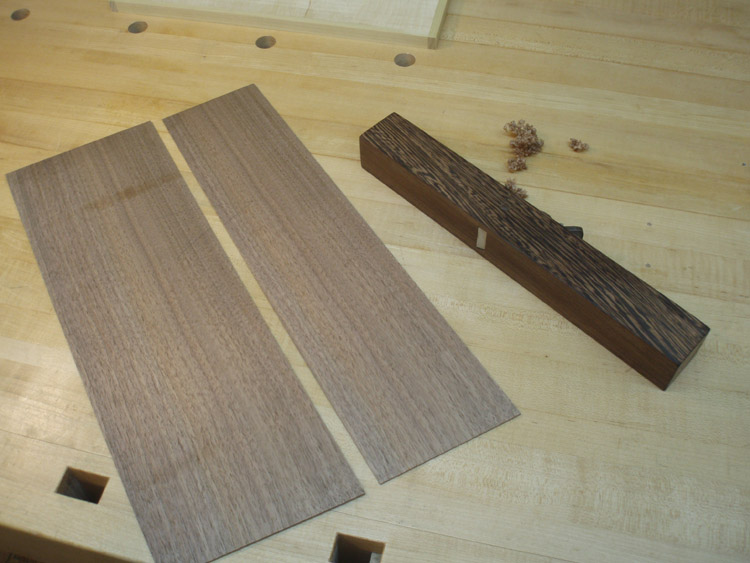
I cut or splice the veneer in strategic spots and angles to best match color and grain when they are joined. I use my little jointer plane to shoot the edges straight and smooth to make the seam virtually disappear.

To join them I employ the bit of elasticity of painter's tape. Secure the tape to one "half" of the veneer and stretch it as you stick the tape to the other "half." Complete one side, paint a bit of glue on the edge of the 1/16th thick veneer (like a butt/edge joint), flip over and tape the other side. This way you have relative equal force pulling in on the veneer to keep the join planer.

Veneer work, and waiting, is going on while I'm finishing the first round of glue-up components. This time I'm using "orange" or unbleached shellac. A number of thin coats and a coat of fine wax on top.
Yes, I've grown found of certain bottles to hold my finishes, what do you use?

The veneer is ready to be applied but I just wanted to interject a brief bit about the substrate.
The main substrate I'm using is Baltic Birch plywood. I've applied some Poplar pieces to the perimeter. It's an old or perhaps "impractical" step to add these edges we call "bake-ins." What it does for me is to give me a solid wood edge to work with when planing and joining the edges. It works more easily, creates a stronger joint, and simply allows for higher quality results.

Alright, to the application of the veneer. Like in almost every case, I use white glue. To apply the glue to a relatively large surface I use a 4" brayer. That's an ink rolling/printmaking tool you can pick up at most "craft" stores.
You don't need a ton of glue, its not gravy. But a little extra is usually preferable to being too thin.

Glue both sides and don't forget the veneer! I'm using this little set-up I've kept around to veneer relatively small pieces. Solid wood cauls, ply-wood "plates"/cauls, flaw-board, wax paper, and clamps. Low tech and effective, the way I like it!

Pre-finishing continues, some uncomfortable angled glues-up will follow next time.

Monday, March 18, 2013

Combo Amp Stand

Ah yes, starting a new project!
This one is furniture of a bit different kind. I'm making an Amp Stand for a guitarist that has spent many years honing their craft and gear.
This is the mock-up on the left and the pieces for the finished product to the right. Kind of funny how much it looks like a chair. That's what happens when a furniture maker designs and amp stand heh.

Though relatively small and airy, it is a fairly complicated build with angles, loaded joinery, and knowing that a fairly heavy vibrating object is to be used on it.
This drawing represents the main rail, that the amp's bottom will sit on, and the connection to the front leg. There is to be a through tenon in the main rail so room for joinery from the leg is tight. I decided to opt for three dowels. In this case it is a more effective use of space than a tenon.

After cutting, finessing, boring, and fitting I've got the main triangles dry fitting pretty well.


On to the through tenon mortises. I was a bit nervous about this because it has been so long since I've done free-hand mortise cutting, and it's a fairly big bit at the end of a rail. Luckily this Walnut is working nicely and the process quickly came back to me.
Taping your work-piece to a backer board prevents blow-out and adds stability to your work-piece.

The chair-like sides are just about ready for edge and end-grain treatment. I figure I'd get a start on that little shelf. I'm laminating a substrate to make my desired thickness. While that is clamped face-gluing I went to the band saw and planer to make veneer from the same plank of Walnut the rest of the piece is made from.

I'm feeling pretty good about my rate of progress thus far. I hope I haven't jinxed it!

Monday, March 4, 2013

Little Medicine Cabinet

Finally finished and installed that little Medicine Cabinet I was working on.
It is an addition to Eva's tiny bathroom remodeling, which as you may see is still not complete. I've done my part, and am fairly pleased with it.

The cabinet is made of Fir, the back panel, drawer sides and bottoms are Maple.
May not be my finest work, but hey, it's a pretty nice bathroom medicine cabinet!

I've been away from the blog a bit. I hope to get back at it with some more projects.
Next, I'm looking to build an Amp Stand for a nice little combo amp. More on that later!