Work continues. So the leg stock came down to final dimension then was further scrutinized, cross-cut points were chosen and made. Above is a picture of cutting the legs to final length. Nothing fancy, pretty primitive actually but it works and works well. The ply-wood "backer" is clamped onto the cross-cut sled to extend the range of my stop-block and to give a cleaner cut and the back of the operation. Make one cut, put the next piece in at the stop block and cut at the same length.

Due to certain "qualities" of the table saw in use I get some rougher cuts than I would like. It takes some extra time to clean them up. Here is the set-up I use to do so... Block plane, plane adjustment hammer, and the "little buddy". That little square is SO handy. It costs a pretty penny for such a little guy but it is well worth it!

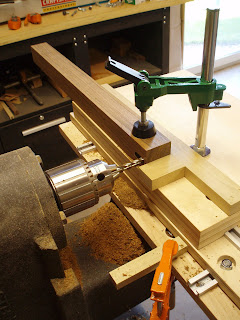
The boring machine and x-y table in their first real action in my possession. My depth-stop might be a bit crude, but it works. Once again a series of stop-blocks for repeatable operations.

After 64 mortises all the legs look like this. The pair of mortises up top are only 7/16" deep as to not run into one another. They were never meant to be the primary structure for the tables, I wasn't even thinking of using aprons till I got to the mock-up. The stretcher joinery is of more than sufficient depth but those 7/16" stub tenons, when fit well, can be surprisingly strong. I'm using single tenon joinery on the side tables, and pedestals. For the kind of loads these tables will bare this joinery will last more than a life-time when fit well. Some double tenons may appear in the coffee tables.

On to frame members. The same process for final cutting is followed with all components but this time I can use my "shooting board" for end-grain clean-up. Adjust your backer block and blade for 90 degree cuts and shoot away.

After the end-grain was cleaned up I wanted to do some surface prep before I cut the rebates for the panels. At least prep the bottom side. With the rebates cut out the work piece is less supported on one side which could lead to skewed results while planing.
This is also the first real action for my new scraper plane. It takes a little getting used to but It was working well after a little learning curve. The Shedua can sometimes be planed... I've had mixed results. You HAVE to use a very light cut do plane it. Some pieces give me a very fine surface after a plane stroke and some get gnarly after the same ever so light cut. I figure it's safer to scrape but the combination of light cuts, the hard cocobolo plane, and the sharpening simple sharpening method I adapted I have seen some pretty smooth results. It will still need light sanding but hopefully not a lot.

Finally to cutting those rebates for the panels aka table-tops. I have found that the Kwila works better in every way than the Shedua but in this operation is was especially true (the Shedua even smells a bit unpleasant). Though I'm never taking heavey cuts the Kwila would work well under twice the cut load as the Shedua. I did run all of them through on each setting though. It's good practice to cut less off than you think you need to, at least for those of us who can get greedy. I did make a pass that was too deep for the Shedua that left a pretty nasty tear-out but it was early enough in the process to come back from.


4 comments:
64 mortises?! how many tables are you making there buddy?
i super jealous of that boring machine you got there...
Heh yeah there are 4 mortises per leg and I am doing 4 tables. I think there will be 20 tenon joints per table, all "floating tenons" so there will actually be 40 mortises per table... that sounds kind of crazy.
Yeah I think I would be pretty frustrated without the boring machine. A square chisel mortiser might be faster but in my experience they don't give a clean enough cut.
Well on that I should get down to work heh
Looks good Nick,
I was wondering if the top panel will be veneered or solid. Also, what are your plans when they are finished. gallery?
Thanks Jason. Yeah the panels are to be veneered then fit and glued into place in the frames, much like a back panel. I'm looking forward to the fitting moment heh.
When ALL the tables are done (side, pedestal, coffee) there will be little photo shoot, assemble the work I have for a portfolio and then yes it's off to find some galleries. I'm not excited about working through a gallery but hopefully I can find one or two to be a good starting point.
Post a Comment