Monday, September 28, 2009

Frame work.... more-tises


Jumping in... After the rebates were made in the frame members I made room for the joinery. A portion of the rebate was cross-cut on the table saw then the waste was ripped on the band saw. I'm trying to cut pretty close because it makes clean up easier and I have 16 cuts to clean up. CAREFUL though it's a lot easier to take material away than put more back!
The clean up with chisel was the one operation where the Shedua worked better than the Kwila... Neither worked well but the Shedua responded better to cross-grain cutting. Even with the work clamped tightly to the bench (supporting the bottom of the cut) the stringy Kwila would blow out.


More mortises. These are the Styles of the frame. Prior to the mock-up I had thought of using slip-tenons aka bridal joints but I found the open joinery to be quite distracting in these "designs". I also like the little steps I'm using with the styles, like a bread board. That would just be silly with slip tenons heh.


One of the biggest improvements in knowledge, skill, and mind-set I got from going to IP was in veneer work. Not that the school focuses solely on veneer, but a more sensitive "style" of veneering is taught. Being familiar with industrial use of veneer I had a distaste for it. The school teaches shop-sawn veneer, use of "bake-ins/ons", added potential for grain graphics, and so forth. Also when you take a look at some pieces, you discover that even the configuration, form, or structure could not even happen in solid wood.
I still don't feel that the veneering process for a whole piece is the most conductive to the way I like to work, but perhaps with time and practice It will work better and better for me. The veneering I'm doing for these tables is pretty simple compaired to my last project though so it's nothing to sweat. This is another case that I just couldn't make these tops the way I invisioned without the help of veneering.


It didn't take too long to put together these lillte substrates. 1/4" birch plywood with 5/16" poplar "bake-ins".


Back to the frames. Yay! I finally just got a start on the tenon fitting. All the tenons in these pieces are "floating tenons". I had always used live tenons untill the Chinese Elm Cabinet stand. I like the feel of live tenons but in some cases floating ones make a little more "sense". These guys can be about as strong as live tenons (in a test I saw I think the live tenon lasted a couple more pounds of pressure) but they have to be fit well. With the use of the x-y table for mortising and carefull machining of the tenon stock the fitting is going quite well and smooth :) They don't quite fit off the machines but are very close. You don't want to be struggling over something as important as joinery when you have 80 joints to make (160 if you count both sides of the joint).
I'm happy getting to this point because it means that something more resembling furniture might show up soon!

Sunday, September 20, 2009

leg mortise & frame prep


Work continues. So the leg stock came down to final dimension then was further scrutinized, cross-cut points were chosen and made. Above is a picture of cutting the legs to final length. Nothing fancy, pretty primitive actually but it works and works well. The ply-wood "backer" is clamped onto the cross-cut sled to extend the range of my stop-block and to give a cleaner cut and the back of the operation. Make one cut, put the next piece in at the stop block and cut at the same length.


Due to certain "qualities" of the table saw in use I get some rougher cuts than I would like. It takes some extra time to clean them up. Here is the set-up I use to do so... Block plane, plane adjustment hammer, and the "little buddy". That little square is SO handy. It costs a pretty penny for such a little guy but it is well worth it!


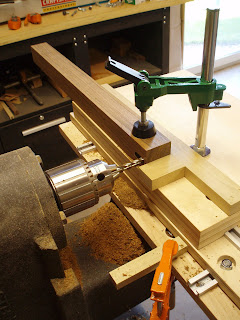
The boring machine and x-y table in their first real action in my possession. My depth-stop might be a bit crude, but it works. Once again a series of stop-blocks for repeatable operations.


After 64 mortises all the legs look like this. The pair of mortises up top are only 7/16" deep as to not run into one another. They were never meant to be the primary structure for the tables, I wasn't even thinking of using aprons till I got to the mock-up. The stretcher joinery is of more than sufficient depth but those 7/16" stub tenons, when fit well, can be surprisingly strong. I'm using single tenon joinery on the side tables, and pedestals. For the kind of loads these tables will bare this joinery will last more than a life-time when fit well. Some double tenons may appear in the coffee tables.


On to frame members. The same process for final cutting is followed with all components but this time I can use my "shooting board" for end-grain clean-up. Adjust your backer block and blade for 90 degree cuts and shoot away.


After the end-grain was cleaned up I wanted to do some surface prep before I cut the rebates for the panels. At least prep the bottom side. With the rebates cut out the work piece is less supported on one side which could lead to skewed results while planing.
This is also the first real action for my new scraper plane. It takes a little getting used to but It was working well after a little learning curve. The Shedua can sometimes be planed... I've had mixed results. You HAVE to use a very light cut do plane it. Some pieces give me a very fine surface after a plane stroke and some get gnarly after the same ever so light cut. I figure it's safer to scrape but the combination of light cuts, the hard cocobolo plane, and the sharpening simple sharpening method I adapted I have seen some pretty smooth results. It will still need light sanding but hopefully not a lot.


Finally to cutting those rebates for the panels aka table-tops. I have found that the Kwila works better in every way than the Shedua but in this operation is was especially true (the Shedua even smells a bit unpleasant). Though I'm never taking heavey cuts the Kwila would work well under twice the cut load as the Shedua. I did run all of them through on each setting though. It's good practice to cut less off than you think you need to, at least for those of us who can get greedy. I did make a pass that was too deep for the Shedua that left a pretty nasty tear-out but it was early enough in the process to come back from.

Saturday, September 12, 2009

Frame Side Table - mill work


So the "real" work begins. Here is a set of "negative templates" for the side table. The templates are cut to the finished dimension of the stock desired and allow you to easily see the grain and adjust for grain graphics of components. This is how I map out components in planks. Before going to IP I didn't spend nearly as much time in the milling process. Being in a school for the industrial cabinet shop I was concerned with minimizing waste and time. Of course one should still be mindful of such things.


The component search doesn't stop at whatever surface you have. Every axis is open for interpretation. This is why, to others, I make a big deal out of getting at least 2" thick stock. What I'm doing above is re-sawing at and angle to get a pair of rift-sawn components out of a pretty flat-sawn piece. Getting a higher angle of annual rings shows a more calm and orderly surface grain which is also easier to "predict".
For sure this milling takes a fair bit of time, but this is what your project is made of! heh. Yes it's more "wasteful" and yes it takes longer but this is a "different" product. I am trying to use the best aspects of the material and help not only the furniture but the tree "sing" as it were and reach a level of harmony in it's new life.


After about 18 hours of milling this spread of rough components showed up. It's about enough for 4 side tables. Kwila on the left and Shedua on the right.
It took up almost all the 20 board feet of each species I had! I went through about 10 b/f just to get the 8 legs of each set!


This is what I have "left". Kwila on the right Shedua on the left. The shedua is about 22" long. The scary thing is that I don't even have all the pieces I need! I need a couple stretcher pieces out of each. I decided to wait just in case I have a mishap on the way. I don't like to be this close, just scratching by, but now I know that I should get more than 20 b/f per pair.


Back to milling... round two. I rough out the stock a fair bit oversized. This allows for movement in the wood to happen still be able to get the stock straight again and for any slight adjustments in grain graftics. Each piece of this run was roughed and squared, then let rest for about 2 days. Squared again and brought within a 1/16" of final dimension, let rest, and I have one more round to go. This succuessive milling takes for less time than the initial milling though I believe it is still important.


After I set the pieces to rest again I started a plywood re-saw fence for veneer cutting on the band saw and I came back to this little guy... a scraper plane. I started this a while ago in anticipation for this project and plain old needing it in the future. I had it all done except a wedge. Well now, I've heard a number of people with mixed feelings about these wooden scraper planes. The common suffering is that the blade doesn't stay at a set cut depth. It just scoots up due to all the chatter of scraping. I do not know but my feeling is that they may be using too hard of wood for a wedge. It may look funny but I tried a wedge in poplar because it is relatively soft. The give in the poplar really lets you jam the wedge in there and absorbs some of the vibration that a matching cocobolo wedge would not. I have only used it in test scraping for about 5 min but the depth was quite consistent and I bet if I went down there again with out adjusting it I would get a similar shaving. That's a lot longer than I've heard other people re-setting their planes. Who knows maybe it will start acting up on me with more use... one way to find out. Maybe a Walnut wedge would look better?

Thursday, September 10, 2009

James Krenov, be well


I have just caught word that yesterday James (Jim) Krenov has passed on, or as he would say, joined the cosmos. Jim has been a role model in craft and in life. My thoughts go to his family, his friends, and students around the world.
His works are not well known widely but are held dear to a relative few of us. Though I have only relatively recently found his works myself, I am very glad I did and the time was right. His first book A Cabinetmaker's Notebook is perhaps the most influential woodworking book published and has little to do with woodworking specifics. I finished it quickly eager for the next.


Though Jim is better known for his cabinets, this writing desk is one of my favorite pieces. It seemed quiet yet somehow profound to me. Made of Italian Walnut, I believe, holding his slide was the first time I saw it in color. It was Jim's work and his words that lead me to Inside Passage to study with a long time friend and student of Jim's, Robert Van Norman. We were lucky enough to hear Jim's voice over the phone just about every week sharing his experience and passion, along with some laughs.
Through his work, his writing, and teaching James has striven for integrity, fine workmanship, persistence (perhaps stubbornly), patience, humanity, and perhaps above all living "richly".

It is hard for me to explain but all of Jim's works are there for me in the whisper of my plane. It's there for his students, for Robert and his students, my classmates, my friends. Remember from time to time to slow down, and listen.

Thank you Jim and be well.

Monday, September 7, 2009

X-Y Table & some scrubbing


Taking breaks from mocking up I spent some time attempting a "poor man's x-y table" Just some plywood and T bars. The hold-down was a pleasant surprise waiting for me at a local store. To my experience I never thought I would stumble upon something I was actually looking for and costing less than I anticipated! It's made by Wood River and labeled as a drill press hold down. I picked it up on sale for about $12. It's by no means super heavy duty but for $12 I think it's pretty good. Having a plywood top I can just drill a new hole for it when the need arises.
I don't know how long this table will last or how long till I'm fed up with it but it will do for now.


With the two mock ups done I worked on the coffee table mock up. I did not think it would give me so much trouble. The two smaller tables are just that... smaller, and taller proportionally. I felt I achieved a level of grace and a balance between airiness and stability with the first two, but the coffee table didn't seem to come to life so "easily". A coffee table is quite the opposite to a pedestal, but I'm trying to keep a similar theme and feeling.
I got closer to what I want with it but by that point was getting tired of mocking up. Sooooo I'm putting the coffee table aside for now to start on the real deal of the others.
Pictured above, scrubbing a pair of Kwila planks from Jason at Cormark International in North Carolina. Sorry guys, this is what I use my metal plane for heh.
It's always nice to get back into project wood. This Kwila is quite nice. It's pretty straight grained, I wasn't seeing much tear-out even with my rough scrubbing, it's in the mid slightly dark tones of Kwila I've seen, and there's some nice chatoyance. I need to get more of this! Though there are so many others I would like to get my hands on as well.

Well my schedule at the part-time job is a bit more full than I would like it to be this month. Hopefully I will still be able to get some good work done.