Thursday, March 25, 2010

wrapping up... but... of course


Long time no blog... well at least lots of photos.
Here we go.
The edge treatment and pre-finishing done it was assembly time! First I glued up the frames.


Then the base parts.
As the base glue ups sat in clamps I worked further on the frames.
Also I tackled the sizable panel fitting for the Kwila table.


Once again a Narra top to match the Kwila side tables. I didn't dare get as close off the saw as I have with the other panels. The big panel is a bit unwieldy on the cheap table saw. A big panel saw would come in handy every now and then heh.
I've been a little anxious about this "joint" as it is a big and very visible one. I took it extra slow, checking frequently for parallelism and how far I was practically every 64th of an inch until I got within a 32nd... then I checked after every few plane strokes... a bit over kill? Maybe, but...


After all that excessive creeping the final fit pretty much kicked ass :). As humble as one may want to be or is comfortable with, sometimes it's good toot that horn a little bit and be happy with a job well done.
I just hope it stays that way after finishing and gluing it in the frame. Glue does of this tendency to change things a bit.


Quickly whipped up a frame with half laps and screws to act as a doweling template.
I did learn a few things in the "industrial" cabinet shop that I would probably never use in my furniture but comes in handy now and then and makes life a little easier.


Dowels fit!
I couldn't put a dowel into the legs because of joinery going on in the leg. I have decided against using brackets as I frankly find them unnecessary for these tables.


Here's a very low tech "jig" (ha) I've been using dealing with dowels widely spaced apart. Cut a notch in a scrap make it as long as you want your dowels to be and use the end to rest your saw blade against while cutting. Maybe a little "crude" but easy and reliable!

Just about there! Hopefully I'll make the final glue ups tomorrow!

HOWEVER...............
There's always something...
a couple in this case.
First the paper for the Oak coffee table to be adhered to the bottom of a glass top. It seems IMPOSSIBLE to find in a large enough size. The standard I'm finding Japanese papers in is about 36-38" long and 24-26" wide. That is wide enough but I need about 45" long!
I went everywhere I could think of around the cities, and then the places that the people who helped me at these places suggested. Then started a wider search on-line... I found ONE roll that looked to be of pretty poor quality.
Unlucky for me, I'm stubborn and know what I want. Lucky for me I have a classmate and friend in Japan! He sent me a link to a website that I could not read (Japanese) but did have photos and prices that I could convert. Now the amount of paper I need for one table would only be about $7 worth but I can't imagine that the shipping residential to residential from Japan will be less than $80 considering a small package I was going to send there was $40 in shipping. Anywho I ordered enough for 4 coffee tables plus there will be left over.

Ok well that being dealt with... Glass.
I originally wanted 5/16" thick glass. Not too light and not too heavy. Turns out that is an "odd" size... seem pretty fricking normal to me. Turns out I was informed that is a "European" thing and that I CAN get some shipped from the East coast at $1700!!!
Ok well I decided on 3/8"... when the frames were assembled I could call to place an order.
What the ^@$#@*(E*(&%#%@%$!^&$^@*&!!!
I can't find anyone willing to work in a tighter tolerance than +/- 1/8" in 3/8" thick glass >:0
That's a QUARTER INCH window!!! Not something I would call acceptable in this case. I've asked if I can pay a higher price for even a tolerance of +/- 1/16" and have been turned down.
The problem is that these are relatively big industrial operations. I don't know that there are any small glass shops with people willing to spent just a little extra time to do something well around here. Getting glass shipped from the place I worked with in Vancouver would cost a bundle! And at that point I would have gone with 5/16" anyway!

Does anyone know any QUALITY glass workers in the Midwest?

Friday, March 12, 2010

Shaving Legs


Leg shaping time again. I have first sawed and shaved the profile for the outside faces. I put some of the pieces together to take a look. I am pillowing the insides with the same tapered pillow which would make the leg appear to flare a bit on the insides even if they were straight otherwise. Looking at the "mock up" I knew it wouldn't be enough. Pictured above shows the amount of material I took off the bottom of the inside faces of the legs... a 1/16"? Is this a bit "excessive" or silly? Perhaps, but it made all the difference :).
Maybe I have mentioned before but again and again I see, well more so feel, a difference when certain elements are off "dead flat". Some things "should" to be flat, like a table top. Other elements are given life, give off a friendlier, more organic sense from even a slight breaking of straight. Careful though it all is a balancing act. It all must be thought of as a whole. Too many, too much, some here less there, with the best of intentions it could not quite end up being what one had hoped. Or maybe if your lucky, better than you hoped.


Lets get that pillow pillowed!


A day later and the main shaping has been done.


Moving on... or not. I always like to put a fresh blade on the band saw before some major re-sawing... this is why. I didn't have any on hand and thought that I hadn't used the band on THAT much. Turns out Oak and Kwila take a toll. Luckily the good people at Eide Saw here in Minneapolis were nice enough to call me back with the blades done less than an hour after I called them.
So I was off to the city. After picking up the blades I stopped by MCTC where I took the Cabinetmaking program to ask if I could use their vacuum press for an up coming veneer glue up. Turns out this week is spring break and there is no class on Fridays. This was Wednesday afternoon by the way. Which means I needed to get the piece glue on in the bag by 5:30 the next day. Alright, but I was on my way to work at the tea shop after MCTC!!! I will go insane if I have to wait a week and a half to do this. I could get material to do a crude mechanical press like I have been doing with the smaller tables, but don't want to spend the money and time for just ONE glue-up. GAhhhhh
All I could think about while at work was what to do about this situation.
I decided to go for it, I'd wake up early and really push to get it done.
I had to put the new blade on the saw, reset and fine tune the resaw setup, saw the veneer, mill bake-ins for the substrate, glue two of them, wait, cut clean and plane them, glue the other two, wait, repeat, find a layout for veneer, rip the veneer for joining, joint the almost 4 foot veneers, glue, wait, glue, wait, repeat, repeat, trim the veneer to appropriate tolerance for the vacuum press, and get to MCTC to actually do a dry run and real thing...


Got home from work at midnight, got out of bed at 6:45 am and hit the band saw by 7:00 ha.
Pretty long veneer joints, at least compared to the other tables.


Tape tape tape, glue glue glue, tape tape tape.


Made it to MCTC and in the bag by 5:20 HA!
I would normally like to stew and spend a little more time with the veneer but I came up with a game plan before the day of work and hope that it would work out. I have yet to see its true outcome, which wont come until finish is applied...

Thursday, March 4, 2010

New Tool, of sorts


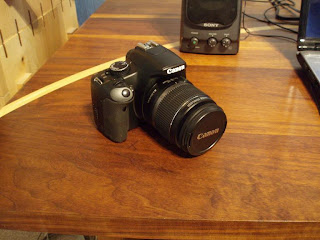
My new tool, a camera heh. I've been planning to get a DSLR for some time but have been holding off a) for the right time, b) just in case there would be any new offerings. With the completion of the table "range" coming it was about time I finally take the plunge with a new camera. I have been hoping to be able to do my own product photography, unless I decided I need something professionally shot. The cost of professional photography is not cheap. One session alone may very well pay for this camera.
It is not the latest or greatest but for the price it is probably the best value. Also though I have taken some courses I have never majored in photography, it would be a bit silly for me to go all out. The Canon 450D aka Rebel xsi. Waiting paid off as I found this guy on craigs list "new in box" for the same price range people were buying these used.
I'm planing on using some 70s Olympus lenses I have access to that I have used with the Olympus OM-1 I've shot with in the past. The lens adapter is ordered and I'm playing the waiting game :) .


I seemed to have developed a bit of an affinity with pottery. I don't know quite when it started but that doesn't much matter ;)
I have also recently found a specifically ceramics gallery in Minneapolis where my eye caught this lovely little piece.


A small bowl by Andrea Leila Denecke of Scandia, MN. I have not met the crafter though I should like to. The under-side of this piece is what really grabbed my attention. A brushed "wash" of slip with evidence of brush strokes, variation in tone and colors due to the firing, an extra "splash" of glaze left to chance.
The thickness is nicely balanced, subtle traces of finger lines, quiet complexity in color variation... No where near perfect regulation yet no where near chaos, it does not feel manufactured but part human, part spontaneous "occurrence".
Pieces like this one embody a number of concepts that just aren't too conductive to furniture making. Processes and topics that I find fascinating and inspiring.
Someday I might like to take a class in pottery but for now I am pleased with the idea of making a small "collection" and living with pieces of beauty of other craftspeople and perhaps giving some away later on for others to enjoy :) .


All right, back to wood working. I have not been able to spend the time I would like in the shop lately because I have been on the job more than normal :/ . Today I made some good progress on the base joinery... in fact, it's done! ha
Pictured above: fitting "floating tenons"... there needs to be a better name for this joint. "floating" or "loose" tenons don't quite sound right when the joint is done well hmmm.


Dry fitting and mocking up to contemplate any minor changes. You will notice that the coffee tables don't have as many stretchers as the other tables... I took a look in the mock up and it simply looked cluttered and dumb with four stretchers. I just beefed up the long aprons in thickness and width. I would say it is still not technically as strong but unless someone is planing on using this table as a very poor trampoline, one needn't worry. It will still be stronger than "need" be.