Friday, June 24, 2011

Back to Desk / Time on my Hands

Alright. You may have noticed that I have some time on my hands.
This is why heh. All this pre-finishing then waiting hours between 8 stages of glue-ups!
I try to be productive but it's the Minnesotan Summer which is short and erratic. When a couple nice days come around it gets difficult to keep ones nose to the grind stone.
The desk is coming along nicely it seems though.

The crossing clamp and "bracing stick" is simple insurance of the distance in front to keep my angles roughly true.

On an unrelated but geeky tangent...
Glass/beerware came to my step today!
I'm not really an excitable kind of guy but I can get excited about adding to my geekery. I'm pretty pumped to give these a go ;).
I figure a number of people out there, like me, like their beer. I also figure I'd give a "shout out" to pubglasses.com for having a decent selection at decent prices. I am missing one or two styles I'd like to add to my disposal though heh.
(No I didn't build the dinning set heh. It's a set my parents got from a Danish store a number of years ago. Nice and quite though.)

Wednesday, June 22, 2011

Nightstand/Side Table Mock-Up

Boof!
Nightstand/Side Table mock-up complete!
I was/am surprised at how little I wanted to change from my sketches.
One thing I find tricky about this form is the "foot print" dimensions lets say... For the top to make a nicely functional top and say hold a decent sized lamp and have comfortable room for a glass or whatever, the piece gets pretty deep. Deeper than I would like if I was just looking at the interior space of the box. It starts to look quite cube-like. I could make it narrower or longer though I wouldn't want to add or subtract much. Hmmm. No more than 3/4" either way for functionality sake.

Kind of cute I'd say. By no means is this a spanking new form, of course not. I'm putting my hands, and eyes to it and I'd like to think it'll come out not QUITE like any other. Plus I have the option of tweaking things for certain applications if (hopefully) asked to reproduce this kind of piece. Same goes for the Frame-Top tables, though I feel those are a bit "tighter bound" by the amount going on in those pieces, which I don't see as a bad thing.

Ugh seems like I'm going to have to name this something. If you can't tell by what I call my other piece, I don't really like naming them heh. I already have a side table "design". I was going to call this a Nightstand though I think it could make a handy side table as well. Hmmm... Make it really "Danish" and call it "Side No. 02" or "Table No. 04" heh?

Monday, June 20, 2011

work work aaaaand more prefinishing

Okie dokie. The pre-finishing from last time had been completed. I glued on the little rails to my aprons and then needed to trim them flush. For the end grain I used a block plane and clamped on a backer block as to not blow out fibers upon exiting the end grain plane strokes. I simply used the angles of the ends themselves to guide my cuts.

It was also time to make a cut that I have been a little scared of. Make the top of the front legs square. Initial cut was on the band saw then I took a plane iron and small mallet for chopping and slicing them clean, neat, and accurately. Wasn't actually as scarey as I thought though it was good to pay extra attention to.

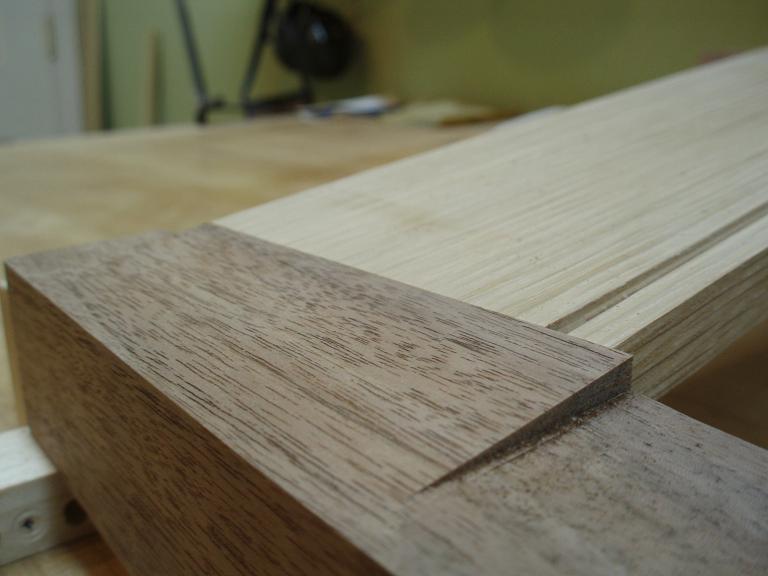
Again involving these little "ramps". Plane the ramp down flush to the inside Oak pieces. Again, the only reason I have these little ramps is that they are a part of my drawer pocket. I want a "seamless" joint between these pieces as to not interfere with the workings of the drawers.

Leg pillowing! Feels like I haven't made legs in a while. I forgot how much time it takes to nicely pillow a leg. This is possibly why it is among the first things to leave a "krenovian's" work when trying to make ends meet.
It is a detail. To some perhaps a small detail. To me, however, I feel it makes a big impact in my work. I find that this detail is rarely specifically pointed out but contributes to an overall effect/"aura" of the pieces. They simply wouldn't feel or be the same piece without it. For now I will stubbornly "stick to my guns".

All surfaces and edges refined and preped... More pre-finishing.
I do have a little work I could do for some of the interior parts though I think I will save that as something to do while the assembly is happening after finishing is done. It will be a pretty major assembly being completed in a number of stages... I'll have time.

For now I may use some time to get a head start on a full scale drawing and maybe mock-up of the next project among other things none woodworking on my plate.

The next project I'm looking at is a pair of nightstands for a lovely talented little Scandinavian blooded gal whom I will be bartering for logo/web design and branding work.
Found this photo in a google image search. I quite like the concept and overall design/proportions and is vaguely similar to the Oak Wall piece I finished not too long ago... that is to say an open box heh not a huge leap. Well I'm looking at taking this piece as inspiration for a nightstand/side table "NN adaptation".
The "box" will be of Euro Beech and I hope to make little stands of Kwila.

Tuesday, June 7, 2011

Oil takes time

Ok. So the major joints have been cut and fit. I "whipped up" some rails that will be applied to the aprons which will correlate to the horizontal drawer pocket division in the front of the desk (the bottom of the drawer pocket).
Nick B, you'll notice this ha you did something like it on your hall table :P.

Before those little rails are applied I'm going to pre-finish the face of the apron and rail along with the little step corner of the rail. This way I don't have to deal with trying to put finish along corners. However, oil TAKES TIME to dry so it will be a bit of a process.
I'm changing up my oil concoction a bit. I took out the 1/3 plain tung oil and am just thinning down Original Waterlox by 1/3. I figure the desk is something I want a little more "heafty" finish on. That's not to say "thick" though. I'm also not planing on using wax to simplify any touch ups in the desk's hopefully long future.
Ha if only I got paid for product placement.
With this cut of finish I'm finding 24 hours between coats to be alright for the first 3. I though about finishing with the 4th and last coat without thinning the oil. It has been about a day and a half and needs more time. I'm not thrilled about how it's looking but what can ya do but wait for it to dry enough to work with. So I'll see how it goes and see what I can do.

So I've had some time on my hands. I made a bit of a story-stick for the drawer pocket and got going on the web-frame.
Here is the mortise side of a couple slip-tenon frame joints.

And then there's the frame members for the pocket partitions.

Poof! Gluing up the middle pieces to the front horizontal piece. This will just make life a little easier when gluing the whole frame up.

Now what? Well I suppose I can get a start on some initial leg shaping!

Work is a little here and there at the moment but at least things are starting to look less like random boards!