Sunday, June 28, 2009

sheet rock on


The beginning of the week was very humid and hot here in the Minneapolis area. I am lucky to be in a basement that feels quite dry and cool. Although that coolness did not allow for my epoxy dog-strip glue up to cure in a speedy manner. What to do while waiting? If the first thing in or mind isn't flooring and sheet rock, well, you don't know what you're missing!
So yes I "coincidentally" took a break from the bench to turn on the room as the epoxy and some extra time to cure. Special thanks goes out to my good friend Evan for helping me carry this stuff through 95 degrees and thick humidity on a sunny afternoon.


So yes fast forward a couple days and I'm working on the hardware. Here cutting a slot for the tail vise track. Yes a couple weeks ago I ended up getting the Triton plunge router because it was readily available, half as much as a festool, and should work well mounted to a router table. I'm sad to say that a shaper does not look to be in my near future unless there is some ridiculous deal somewhere. This bench project is causing me to pick up the router more than I've done before. I'm not fond of them. They make a terrible noise, I don't like the feel of them, the super high RPM, and the overall lack of "grace" I guess.
One day I will have a nice sturdy torquey relatively quite shaper, but till then it will be whinning and moaning from the router table... and probably some from me as well.


Hardware is my least favorite part of any project, but it needs to be done. This pictures a little aid I made to help remove some of the variables in the hardware dilemma. The L block was cut on the table saw to the height that I wanted the plate to go. Clamp the block to the bench and you have a nice sturdy stop to position the plate.
I'm getting close. I imagine in the up coming week I will have a completed bench at my disposal. I'm sure I've said it already I'm looking forward to moving on but have a number of things to do before I can get back to furniture.

Sunday, June 21, 2009

Bench top


As I mentioned it was bench top time. I got this "slab" of laminated maple (oriented quarter-sawn) 2nd or 3rd hand quite cheap. It had a thick finish on it that just sounded terrible as I scraped it off. As it turns out this just did not want to plane... the random quarter sawn lamination although good for stability is not so good for working. Thus I continued with the scraper.


Here the top is pretty clean of finish and had a little work on flattening... You can see how much work there is to go especially with a cabinet scraper! I spent over 2 days getting it flat enough to move on and boy are my shoulders, arms, and legs sore! Half that time was spent sharpening though. The point of operation with scrapers is typically a bur or hook on the edge. This doesn't last very long at all... a bit longer than it takes to create that bur... at least when taking relatively heavy shavings for a scraper.


After all that I went on to the "bread board" ends. Here is a big tongue awaiting a groove.


Jimmy rigged set up for edge jointing. This is defiantly the biggest edge joint I've done. Also the "dog strip" at this point is 5 1/2" thick of laminated maple so there is little to no give in it. I thought it was going to take me longer but it only took about an hour and a half to do.


Doweling jig on a large scale! Only five 3/8" dowels, more for location than strength. I drilled the dowel holes so that the dog strip would sit a bit higher than the rest of the top. I'd much rather bring the 6" strip down to the bench than the twenty something inch top to the strip!


And here is the glue up that just happened. I used epoxy here for some extra insurance. Now I have to think about scraping some more. It's getting closer every day but I might take a break from the bench to work on getting the to-be bench room ready to put the bench in.
I don't know we'll see.

Sunday, June 14, 2009

ash of base


It is Sunday morning and I am a bit beat from my evening/night job but here I am trying to make some sense. The bulky parts are laid out about ready for assembly. All the edges were softened by way of block and smooth plane. It took a bit of time but it was a welcome break from machining. I thought about skipping the surface prep because it's a workbench but knew it would bug me in the end to see the washboard of the jointer and planer UGH! heh. SO. I took my lyptus smoother to the surfaces and block plane to the end grain.


Fast forward and Tah Dah! The base is pretty much done. The legs will get little removable riser blocks so that I can adjust the height as I see fit. The benchtop without them will be about 34 1/2" high. I typically think of workbenches being about 35". I am not tall and it is easier to raise the bench than lower it hence the blocks!
The trestle legs are glued up and cross pinned. The stretchers are dry fit as to make the base more portable. The stretchers have 1" deep tenons that are fit a little bit loose along the legnth of the mortise to allow for any movement... the lag screws are fed through oversized holes in the legs for the same reason.
This thing is really sturdy! little to no movement with me monkeying around on it.


I took another little break with the cross pins. Counter-sunk and pillowed Oak doweling. I hadn't been any kind of fan of oak mainly because of it's gratuitous use... and the ways it's been used. However seeing Ian's work and working with these dowels I have a new view on it. It works well and it is a calm looking wood. Rift-sawn oak is a welcome sight. I don't think it lives very well as flat-sawn and I have been over exposed to the quarter-sawn with it's pronounced ray flecks. The rift however is a bit softer, more friendly. Working the dowels I noticed how interesting The structure is on a close scale. From afar even from a couple feet it looks pretty mellow (which is good) but close up... I don't know, it reminded me of a clean shallow creek running over smoothed rocks in colors of wheat, oats, and earth. HA pretty "far out" description, don't worry I wont be cropping dirty dreds any time soon.

I have also been working on the dog strip separate from the rest of the benchtop (as I was using the rest of it) Next I'm looking at cutting the existing top to size and starting the quest for flatness YIKES!

Sunday, June 7, 2009

chip chop chip


Now, you may say that looks like a super massive black whole... here's the deal. I was planning on twin 1/2" tenons (for the bench we're talking) but the router I was using was giving me grief. I already started the mortises and the got out of whack, with that router"s whackness. My options are limited at this point so I was looking and drilling and chopping by hand. I did a fair amount of this while at MCTC but as I soon discovered I didn't mind that I hadn't done it since then ha. I forgot how long it takes to hand chop a mortise! I wasn't about to try the twin tenons with a 2" depth by hand so I just opened it up.


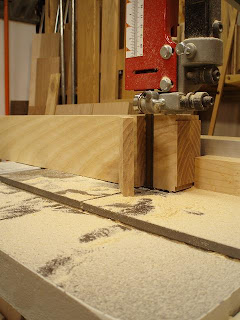
Here at my little 14" band saw cutting checks off big ole tenons. It cuts fairly well for a cheap little guy. Well enough for the bench joinery (still need to hand clean the cuts) but I don't know about furniture joinery... I think I'm going to look into a carbide blade and hope that this guy can handle it.


Tenons cut prior to fitting.


The tenon fitting went much more smoothly that the mortise making. It's finnally looking like a little something besides heavey planks on a table. This is my most massive project to date. I must say that I'm looking forward to getting back to furniture!


Before I did the tenon shoulder cuts on the legs I made this cross-cut sled. Pretty decent. The backing board is attatched by four bolts through oversized holes to allow for square adjustment.


More packages!!! I ordered some of those lovely aluminum bar-clamps that I made friends with at IP. These came from a little place called Dubuque Clamp Works in Iowa. Very friendly people. They don't have a website or anything but I wont hesitate to give them a call for any clamping needs.