Thursday, September 23, 2010

Showcase Pre-finish

 Still working at it. Getting closer to the final product the work becomes less and less visible, but there is still much to be done.
Rebates for the back panel made on the router table need to be squared off.
Trimming was done to the length and prepped for the applied edges to go on.

Mortises made for flipper-floppers, levelers, and hinges. First roughed with a trim router then cut clean with chisels.
Edges applied and shaped. My father came down one day as he sometimes does to take a look at what I've been doing. He came across these edges and said "uh, is that showing intentionally?" (in regards to the end grain of the edge). It caught me a little off guard as a comment of an "outside perspective" lets say. not that I needed to rethink what I've done, just never thought of explaining it before.
I think it is a nice visual detail adding another "layer" to the piece. The small amount of end grain showing with choice of the grain graphics give a little lift/spring/counter balance to the larger grain line. I also like the way that it shows it is honestly a veneered piece. No hiding it.
Through the gratuitous use of veneer in mediocre ways veneer has gained a bad rap. Well it doesn't have to be so. This piece simply could not be built the way I'm building it using solid wood.
Making a fine veneered piece is quite different from the cheap stuff we see day in and out. In fact, depending on pieces, a veneered piece can be made to look more "refined" than a solid piece that may have more casual feeling to it.
Ok. Getting those little sticks made to hold the glass in place. My father, once again, asked why I didn't just make grooves in the frames to capture the glass. I've seen this done and am pretty baffled by it. Structurally it makes sense, and it is easier to do. Well this glass is only 3/32" thick. What happens if your $10 piece of captured glass breaks? It ruins your $10,000 cabinet! Seems pretty absurd, right? This way the glass can be replaced.
Annnnnnd pre-finish. Those little sticks added a heck of a lot of edges to take care of!
Four coats shellac, one coat wax.

Wednesday, September 15, 2010

Stationery?

This is something I've been thinking about for a while though have yet to put into action.
I have been big into the whole minimalist clean thing. Letting the work do the talking, I mean how can one sum up hours upon hours of contemplation, shavings, sweat, and sometimes blood in a few words. The work itself IS the expression of all of that, but is that too much to ask of an audience? As a/the builder of these pieces I'm likely coming from a different perspective. Ones close to the work can read the work in detail.
How about potential customers and friends? I'm sure everyone is coming from different places and backgrounds with different sets of tastes and levels of understanding in a variety of settings.
Soooo here's an attempt to perhaps bridge some sort of gap. Little "post cards" I guess one may call them. To be set on, in, or by pieces in galleries and such viewers can take them as they will if they are interested. Perhaps get a little insight as to what I'm trying to accomplish and maybe get a little excited about the piece?

So lets call the text side the front and picture side the back. You can click on the photos to see a larger view here online.
I don't want to sound like a raging hippie nor do I want to sound like a marketing douche ha. Too much? Too little? Eh?

Back.

Front.

Back.

One could also mail these to interested parties upon completion of a piece.
I also hope that they may help me stand out in the crowd of louder pieces that surround me.
Hmmmm.
Turns out these JPEGs are a bit small on screen SORRY!
The actual post cards are about 5.5" x 4.25" (quarter of a standard 11x8.5" sheet)

Friday, September 10, 2010

Backed up!

Holy crap, I didn't realize how backed up I was getting with my photos here! My last couple posts weren't about the work so have too many photos and had to edit a fast moving post here, that's ok some it was boring stuff anyway.
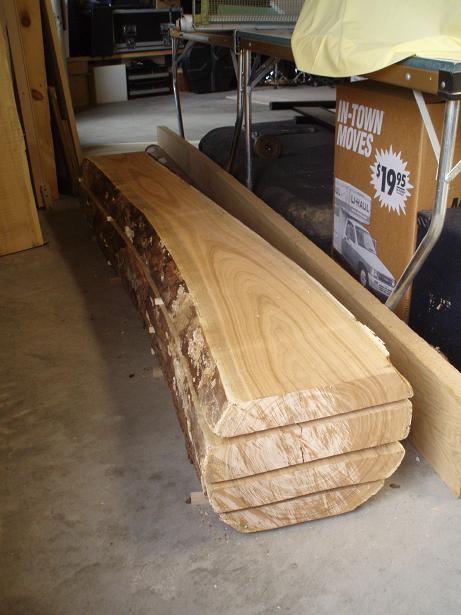
So There is the nice section of Maple I'm using for the top, bottom, partition, and back panel... veneered. This piece is about 20" wide! Much too wide for my small machinery. Something has to be done.

I had to rip the plank into 3 pieces along grain lines as best I could to fit them in my band saw.

Fast forward several HOURS of veneer cutting on the band saw and this is what the shop looked like... dusty.

Cut and sent through the planer, a bunch of nice 1/16" Maple veneer.

While the lumber-core I was making was being pressed with cross-banding I paid some attention to the doors again. Leveling out the accommodating material of the styles. I'm using my 1-3/4" coopering plane to make the back side of the style concave to match the curve of the door. It's a very nice detail to feel.

Poplar lumber-core with cross-banding. Now I need to know what size to cut it.

To help me out with that I got to making my side spacing template. I need to make it also exact because I don't really have room for adjusting the doors except the over lap where the doors meet can be trimmed about a 1/16" or so heh. Once again I made my template ever so slightly tapered thus building in "let-go" into the cabinet. This cabinet does not get drawers but it will aid in partition fitting yet again.

Fast forward applying bake-ins in the substrates and it's time to get the veneer back together. With the Maple lined back up as best I could I'm once again using tape for joining veneer.
I thought this shot might "demystify" the whole tape thing for those who may raise their brow about it ha. So. Take a piece of tape. Adhere it to one side of the joint (press it heh). Then pull both the joint and tape tight and adhere to the joining piece of veneer. The tape has some elasticity to it and will pull/spring back giving you your "clamping force". Now you need good fitting edge joints to do this. It does apply pressure but not like screw clamps or wedges.
Once you have all the tape on one side apply glue to the edge, flip the veneer over and follow the same procedure thus equaling the pressure on both sides which will keep the veneer pressed and level for curing.
Ta Da!

Fast forward the veneer pressing and trimming. I'm making adjustments to the sides by shooting the top and bottom of said sides. Pictured are the two side frames lined up. I'm trying to get the front edges, where the doors will go, to exactly line up as to avoid complications with the doors.

FF the doweling process and the cabinet is finally dry-fit for the first time! It feels like it has been a long time coming to this point, and it has been. There is still plenty to do but it's nice to finally be able to stand back and look at something that looks a bit like a box ha.

Tuesday, September 7, 2010

A Wood Hound Strikes Again!

Oh man, it has been a while since new wood has come into the basement shop! This load is one of the up-lifting things I needed heh.
So I keep loose taps on the Craig's List "Materials" category and have noticed some re-occurring adds for Ash and figured I'd give this guy a call... maybe he has the odd large piece maybe air dried stuff that one can happen upon at a small sawyer's mill. I know my friend and classmate Craig had gone a couple months ago and scored some sweet looking Red Elm. I figured he'd snatched the select planks. I took a trip on over anyway to see what I could see.
I wasn't overly impressed by the Ash but there were a few other goodies there!

Such as this little flitched log of Cherry!!! heh. Only about 6 feet long and not overly wide but it is relatively clean and Flitch cut! One does NOT happen on this ind of thing often, so I took it.
There is another piece of Cherry that is not pictured. I wasn't very excited about it but I felt bad for taking the guy's primo stuff and leaving a single flat-sawn board. Turns out that extra board isn't even a part of this log! GAH shows me for having morals :/. Maybe I can hand it off to someone who will use it... after I'm done with this log just in case.

Then these planks of Maple that had just started to spalt. Some of the coloring is quite nice and some is kind of funky. I'm not sure how I feel about them but figured I'd give them a shot. There is a Pith plank and the next one to either side of the Pith, also a random plank of maple in similar condition but cleaner and straighter than these.

And last but not least, these guys. Craig may recognize these as the Red Elm he left behind... WHY Craig, WHY!? Why would you leave such planks behind? Oh well better for me, sorry Craig but I'm picking up your slack heheh. These pieces may not be sequential but the story is that they were from a quite tall tree and due to equipment they had to cut the trunk up into shorter pieces (about 6 feet?). They are at least from the same tree which is nice. A big Pith Plank and two rifty planks. Also the odd little guy on the floor I thought might be useful when doing curved stuff... though with the checks it's a bit short for the cabinet in my head :/.
All of this... about 180 bf for a smidge over $500!!! I was happy and the sawyer seemed happy as well :).
With new material in the shop and the refreshing cooler temps outside I hope I can get back on the ball after a distracting summer!

Friday, September 3, 2010

Return to Roberts Creek and Inside Passage

Looks like I will be headed back to one of my favorite places, Roberts Creek, B.C. Not for good, yet ;). For a couple weeks come March. I will be returning to the Inside Passage School of Fine Woodworking to participate as a guest/relief teacher. I may take some time beyond school days to hang out and maybe make a lumber run or two in the North West while I'm there :).
Though March may not be the best time for a "vacation" I very much look forward to re-connecting with the sites, sounds, the people and the nature of "the creek". I also am much looking forward to meeting more fine people who share such a passion for our craft and to gain inspiration and perhaps some insight with such a mass of top-notch work and workers.