Sunday, May 24, 2009

Back to MN, Planning

So my 9 months at IP are officially over and I already made the 2,200 mile trip back to the Minneapolis area. I already miss the Strait, mountains, creeks, and the bears of Roberts Creek. Also the groggy “good mornings” and “holas” of the beautiful bench room. Whether sun is pouring through or rain drizzling on the many windows a crackling sound accompanied by delicious smells can be heard as the local roasts are ground with a manual grinder. A great group of Craftspeople, I will and do miss them already. Perhaps I will meet them again down the road.
To all my bench mates; be well, please keep building, keep working and enjoy the work. I’m sure it wont be easy but lets try to hang in there. Share your work, start a blog, email me, whatever as it motivates me and I’m sure it works the same with many of us. Good luck to all where ever you end up… and invite me there! Heh.


Planning. One thing about those long drives is that you get lots of time to think whether you want it or not. I’d say about 1,100 miles were spent brainstorming what I was/am to do upon arrival. As it turns out I have much more work to do to get a decent shop-space set up than thought. I tried to think of places to get work shown and how to show it. Most of this time though was spent on a plan for a series of limited production pieces.
Whoa I know that sounds a little weird, and I wasn’t planning of attempting that for some more time. But hear me out. I WAS planning (after getting work space) a little box, then a display case, then we’ll see. Well I think I replaced “we’ll see” with table series and then put that ahead of the display case… perhaps heh.
I have rough plans for a style of table top and a system of legs that will hopefully prove quite versatile. The concept behind this is that I would like to try to “introduce” this style of work to a wider audience. I want to put in as much as what I might say is “my kind of work” … “krenovian” as possible while aiming at a more affordable price. I do NOT plan to skip out of quality. If I’m not building quality than I wont be building. The pieces will include mortise and tenon, and bridal joinery, emphasis on surface quality, pleasing subtle proportions, hand softened edges, attention to grain, and so on. The main “sacrifice” which I don’t even think is a sacrifice is that they will be more simply designed than my last works… but I guess that isn’t saying much because the last works were pretty complex. Also the kind of attention to grain of “true” krenov “style” I will have to tone down because the whole benefit of the runs of work is that you do set-ups once for 5 pieces. So if sizes and shapes slightly chain the efficiency of the work goes down the drain. Don’t get me wrong, I want to be doing and aim to do the “impractical” works, but I have reasons to do the run (not that I don’t want to do it).
Anywho High quality quiet work that will last in physical and aesthetic time. My hope is that I can do a coffee table around $2,000 or less, end tables and stands/pedestals under $1,000 (all gallery pricing), We’ll see if I get to console type tables.
I would also like to use these pieces in education of the audience to high craft (particularly our style of work) I envision a leaflet of sorts containing mainly images of the process. Not typical point and shoot low res stuff. It needs to also be of quality. Everything surrounding the work should represent/reinforce the same kind of quality of the actual work. You sometimes hear about woodworker’s (all craft/trade for that matter) meager romantic lives surrounding a labor of love. Well I don’t think the actual process is celebrated in the same way and I certainly haven’t SEEN it except in some of these blogs. Connection between the worker and the client should be key in these kind of works.
Oh I just remembered you see some of it in Thomas Moser’s book… workers with orbital and spindle sanders wearing dust masks and such heh.

Ah I have too many thoughts about all of this that are difficult to articulate with them all whizzing around. SO maybe there will be more on it latter.

Friday, May 8, 2009

Break time


This post also is a bit late. The end of my time at Inside Passage is quickly approaching and loose ends are trying to be figured out and tied up if they can. I know I will miss all my shop mates and the kind of focused time dedicated to our craft. So The blog hasn't been on the top of my priority list.
The cabinet is still awaiting glass but otherwise done. A couple days after the completion of the cabinet I took a short trip down to Portland, OR again. I visited Portland's beautiful Japanese garden, biked about the city, gathered some Rogue Ales, saw the Oregon coast, and of course Gilmer Wood Co.


I have found that with these last two projects breaks from serious work were pretty much needed. After such effort put in and stress around the finishing touches of a piece (at least in a cramped environment were collisions seem likely to happen) I have not been able to jump directly into the next big project. The day after I tried to work on a mock-up for a chair and I was just too burnt out. So, ROAD TRIP! a little one anyway.
I can't quite describe the feelings I had but it was a little more than just seeing places I've never seen or seen very little of. There was a sense of tired satisfaction of hard work, revitalizing sense of wonder, and an intriguing feeling of solitude alone rocking to tunes in my little car.


I love "Japanese Gardens". Well done they are inspiring for me and what I would like to pursue in the craft. There is an interplay of man and nature, as with all gardens of course, but in these gardens there is less sense of man and more of harmony. There are few linear lines, the medium is left "raw", and warm. They feel to me something like noble. One of the interests to me is that the garden feels like it should be there, in those forms. One would think "yes, of course this garden exists like this what else would they do?" Everything belongs and plays of each other, nothing is wrong, all is at peace. I feel that creating a piece, a work of art (as the garden is), a painting, sculpture, what ever it may be that feels the same way is quite difficult. A piece if left to it's own devices would have come to the same conclusion. At the same time hold one's attention if they let it. It does not scream and shout for your attention but holds an invitation to look longer and more closely.
There are a few pieces here at the Inside Passage that I can look at and say of course he shaped the legs like that, of course the pulls are carved like that, of course the drawer is there, and not because they are obvious or that I would even come to the same conclusion but because there is such a delicate balance within the piece, a strong sense of harmony.


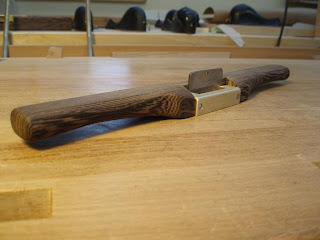
Back to the shop and I am doing some tool making before my trip back to MN. These are both of Wenge, the same that Robert used in his chair. The square one is a jointer with 1" blade and the other a coopering plane with 1" blade for some tighter shaping.


Wenge yet again. This guy, although the wood is TERRIBLE to work was satisfying to make. Since I got a spokeshave in my hand shaping has been my favorite aspect of furniture. Probably pretty eveident in some of my earlier works. I would like to continue to peruse the play of more subtle shapes (though not mute heh). This tool is a srcapeshave or chair-scrape. Basically a scraping tool in the form of a spokeshave. I spent some time in the light shaping of the body the subtle flares, soft dips for my thumbs, pillowed ends, and softened brass. I think it all comes together nicely in this little tool. "You make tools like furniture" Robert said as he passes by. Maybe this is too much fuss over a little slice of wood but I hope it is a sign of what may come. Before that can happen I have a fair amount of work to do. Going back to MN to build up the shop space, figure out what I need to do for money in these rough times and how I can continue building special pieces.

Sunday, May 3, 2009

Cabinet teaser!


Ah there he/she is. The project is pretty much done. The stand and cabinet are all put together, fits have been tuned, dings addressed, door hung, drawers in and all that. I am just waiting for the glass shelves to come. "Sorry" for the teaser but I enjoy an element of surprise or a full show. The sides may look kind of gaping without the shelves; I don't want to "show" the piece until it is complete as intended... You always hear things like "well why isn't there anything there?", "that space looks weird", "why is it like that?" and such. Then when you do get it done there's the ever popular "OH, I get it now" reaction... which I might be guilty of on one or two occasions.


Just finished up the Consoles in Boxwood (thanks Robert!). The box wood is pretty nice to carve. It's hard and cuts well as long as your with the grain. It's a bit yellow though. Hopefully it will dull to that more golden tone quickly.
By the way these little guys are what hold the shelves up.

Saturday, May 2, 2009

Nice Legs...


I am a bit behind on my updates! Finally here are some images of my legs, or my cabinet's legs rather.
I tried taking more photos but I just didn't find that I could photograph them very well. There are a number of things going on with these legs but are mostly subtle-ish over long runs so it's difficult to pick up with the camera. When they are on the cabinet they will make more sense.
As I have mentioned and you may have seen already I've opted for a five-sided leg. I liked the idea of a variation from the four sided leg and felt that legs faced on "45 degree" angles to the corns would flow well with the curves of the piece. What I've found is that these legs would have been easier if straight. Introducing a curve adds challenges in dealing with the 45 degree back portion which is really just a technical issue... however if you have to keep the back portion straight, lets say for joinery down the legs length, it get more aesthetically tricky.
For me it's difficult to explain why... On a four-sided leg with 2 sides curved on the outside corners you see a evenly curved profile standing looking at the middle of the piece (if both sides have the same shape), When looking at the leg from a 45 degree front angle, once again you see even curved profiles. The five-sided leg standing from the middle of the piece you see a similar view to the four-sided leg - curve on the outside profile and straight on the back however the leg will look wider due to the corner in back instead of a 90 degree cut, from a 45 degree angle you see no curve profile, just a straight leg. SOOOO the curve on the one side has nothing to do with the profile looking straight on to the leg. What often happens is that the leg starts to look quite skinny at the pinch of the leg from the side yet too fat straight on.
To combat that problem I put in a shaped pinch along the sides on the legs too. This makes the leading edges of the straight view of the leg come closer together then widen out again. It makes it takes a lot of the visual weight out of the leg and it's neat to do, not to mention adding depth to the leg as a whole. The pinch(es) of the leg is/are about where the stretchers meet the legs.


As I mentions there is a fair amount going on just in the legs. I really like shaping legs but am usually disappointed at how quick that step is done... maybe a day or so. These took me FOUR full days!!! The pinches on the faces brought up above which are all carfully spread over the whole length of the leg, these are all pillowed to varing degrees coming and going with the pinch. The backs! Oh I think that was my favorite part! The photo above shows the run on the back corner. If you think that is looks a bit curved, it is! it's not lense distortion. From about the bottom of the stretcher to the bottom of the leg the back corner comes in only a little over an 1/8". Progressive pillowing down the run makes it a little more obvious. I got a grin out of that. The transition between the flat for joinery and this subtle curve is silky smooth if I say so myself and doesn't even cross the mind when looking at it ;)
Except for the end grain all sides of the legs and edges were finished with my growing collection of spokeshaves. What a quite joy it was to do, to hear the soft whisper of the tools, and is to feel minute facets left by the clean shear of a sharp blade.


Top treatment. I had a couple different ideas for the top but went with a pretty "simple" one. I cut the top at a bit of an angle higher on the outside of the cabinet and gave it a good pillowing. The angle lifts the cabinet at otherwise flat corners and the pillowing is absorbed in the softness of the whole piece. These were done with successive files then on to sand paper strating at 400 all the way up to 1000 with a final polish before finish with #0000 steel wool.

Saturday, April 18, 2009

Euro Cherry leg joinery


The stand has been going pretty well. I don't want to jinx it but I might say pretty smoothly considering all the non-planer angles and "crammed" joinery. Here we are at the horizontal motiser with xy again. The mortises for the legs are set up with stop blocks, height shim, depth shims, and angled leg support. I don't remember the last time I actually used notes on an operation but there was a fair amount going on here... Three different mortise depths, haunched mortises, what shim goes in what order as they are different sizes, and I needed to aim at certain sides of my lines due to refitting the shoulders afterwards.


So for the long stretcher side the haunched hole was bored first. It goes the middle depth to make it past the haunch shoulder but not into the overlapping tenon.


Here is the single shim for the haunch.


The the remaining shoulder portion of the tenon was bored.


Add a shim for the shoulder.


Last the overlapping mortise was bored with no shim to go the full depth of the end mill bit.


Fast forward the fitting of the "loose tenons" and this is was the the joint looks like, pulled apart a bit as to see what's going on. By the way the laminated stretcher is just a bit under 3/4" thick. The tenons are 5/32" thick.


After fine tuning the fit of the legs to the stretchers with the tenons in place (yep it seems as though these structures need to be fit after everything you add for a precise fit) I went to the dowels that will go into the cabinet and the leg.
This is a little single dowel jig that I used with a hand held power drill.


The stretchers were placed with legs to the cabinet, clamped down and the legs removed. Dowel center finders put in the holes and legs loaded once again to lightly press into the center finders. I would normally press the finders more firmly but I am looking for a draw-pin action here. SO, the legs are then taken off and light center marks found. I used a awl to remark the dowel ever so slightly to the inside of the original mark. The off center mark will draw the leg into the side of the joint.
Now the a bulk of the nit-picky (yet pretty enjoyable) part is done... it's shaping time!!! (for the stretchers and legs)

Sunday, April 12, 2009

Moving On to the Cherry


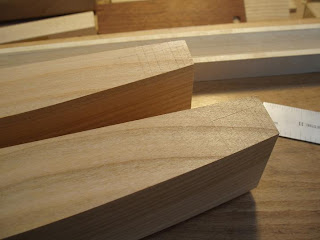
Finally! Time to work on the leg system of this Elm Cabinet. This Euro Cherry is wonderful to work. I've had these block cut and sitting around for quit some time. This week I finally brought them out to have a more serious look. Two beautiful pieces of at least 8/4 rift-sawn material with mild fare curves. One was a bit over a foot long and the other verging on two feet each about 7" wide. Why am I going on describing these? Because it was pretty hard for me to do what I did. I was thinking of getting the two short stretchers of on the one shorter plank and hanging on to the bigger one for another project another day. It was big enough that I could have done a whole small cabinet out of! super nice drawer stock or box or frames or whatever. Especially coming from a comercial cabinet school my first reaction is to get the most efficient use of the material. But this is not what I'm here at IP for. I thought about it and knew that the graphics of the two stretchers cut from the same length side by side would not match. Even if it was a slight difference as this Cherry is more mellow than other woods. I thought this is part of what separates a good piece from a great one.
So after a little more thought I marked the two separate pieces. I knew I was going to cut them on a curve and wanted a subtle curve in the grain to flow with it. so I aimed for a very mellow rift cut heavily on the quarter-sawn side.


This is what came out. I approved with a little chuckle to myself at the band saw.


Back to the legs. The cabinet has notches cut out of the corners to integrate the legs. The five sided legs offer a few slight difficulties over a four sided one, for one holding it has you work. There is a 45 degree cradle under the leg so that I can hit the back sides of the leg with a hand plain to fine tune the fit to the cabinet notches.


Then I flipped the cabinet upside down and clamped the stretcher peices where I wanted them and scored them with a knife. A sharp knife can offer a finer line to work to though it's harder to adjust than a pencil of course.


Here I'm working to those knife lines on the table saw using a quickly put together yet ACCURATE 90 degree cross-cut sled. the riser block props the work piece to help find the angle and to act as a contact point so the angle of the cut doesn't change as more matireal gets cut.


Thanks to the accuracy of the knife marking, cross-cutting, and the human eye there really wasn't a lot of fitting to do. It was a bit stressful work. The integrated legs at another side of complexity and need for accuracy than a separate stand especially on a curved cabinet such as this where there are no repeating angles. The next steps are equally, if not more critical. The preservation of the joinery location without repeating mortise alignment.

Friday, April 10, 2009

Pulling


Yep, pulls are here. Pulls for some reason have been a difficult area for me, or maybe I make it seem difficult for myself. I don't feel as though I have great ideas for pulls. The main thoughts I have had about them is that I don't want them to ruin the rest of the piece ha. I don't consider myself a carver, there are reasons I mainly played drums instead of guitar.
I spent a whole day with pull mock-ups and ended up going with (as often is the case) with the first idea I had. I thankfully acquired some bits of Ornamental Maple from Jody that I used for the pulls. Thee wood more resembles Olive wood than maple and it has a smell which I think of a more subdued King Wood fragrance. Whatever the case it is a great match for the cabinet. I also used this wood for the flipper-flopper and leveler for the door.

Contrary to my previous statement I did not have the worst of times carving these little guys, but it was much more time consuming than I would have liked. Reflecting on it though I find that the pulls are a very important part of as piece. Sure people can touch and caress a cabinet all they want but the pulls are the only point of contact for performing the function of a drawer or door. If the pulls feel wrong then people will feel put off by using them. Maybe they wont pull out the drawer so often to notice how it grabs a bit as it almost comes out. Maybe they wont notice the playful cushion of air softening the closing of a door but think instead about an awkwardness.

Anywho on the technical side. The picture above shows wholes being drilled for dowels. I used tiny dowels instead of live tenons because the grain of the pull in oriented along its length. This means that the "post" only offer short grain. The dowels act as cross reinforcement to the pull.


Ah the slot mortiser with x-y table. Such a beneficial tool to have! I'm not often a fan of sophisticated jigs (which the xy table basically is) but this is one that denfinently will pay off. Here I just used it for the dowel plunge drilling. I clamped the drawer to the table at the angle I needed then drilled a whole, WITHOUT touching the clamp I moved the table and drilled the next whole perfectly parallel to the first.


Drawers are done and finished, pulls are done and attatched, feels good.


The drawer sides and bottoms of woods I got from Dan (yes one could call him "the man") from Vancouver. Beautiful material that these and probably not any picture could do justice... but these are especially poor. I'm afraid of how many pictures I will want to take of the whole cabinet in proper light when it is done... even the bottom of the drawers! Which leads me to another topic that I don't think I'll write about tonight... maybe another night.