Monday, August 31, 2009
Big Leaf Box photos
Here's the little box made of Big Leaf Maple and Sycamore with shellac and wax finish(es). I don't remember the dimensions off my head but some where around 10.5" by 6".
I tend to go a little overboard on the number of pictures I take but it's still not the same as holding it.
The photos aren't amazing but for using my point and shoot camera with a roll of paper and my bench lights they aren't bad.
Thursday, August 27, 2009
Moving on?
With the box basically done the scrap I had been saving just in case fed a fire shared by a couple of close friends. I do not have photos of the project yet because I haven't found adequate light AND the last finishing touch has not been made because the store doesn't have the correct carving chisel in stock... yep.
Anyway while relaxing, staring at the fire, and sipping on some delicious local brews I was looking forward to moving on. This was accompanied by a bit of angst because from here it's for business. Is there an audience for the craft here? Can I find a venue for it? Where can I get materials? Can I finish these projects in a reasonable amount of time? I need to spend even more money to build these and I need to start making bigger payments to my over-head.
I've spent some time working on a shop made X-Y table for my D&W mortiser and I've spent time working on mock-ups.
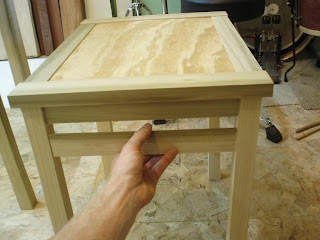
Here are 2 of 3 table mock ups. A side table on the right and a pedestal on the left. A coffee table will join them. You might say hey those look pretty plain... what gives? Well...
They both get stretchers on all four sides. Now, you may be saying well yeah but they are still pretty ... I don't know they are still kind of plain? I would say exactly; they are quiet and they are relatively simple. This is what I want. One reason being they are for small production, I'm starting with 4 units at a time. The fact of economy is that the simple structure makes life easier. However a thing doesn't have to be full of "fantasy" to be interesting. These are to be pieces of subtleties and sensitive details. Pieces that one can pass and hardly notice... it's a strange kind of compliment sometimes, the piece just seems to be right with the world and belong. On the same hand if one cares to look they ought be drawn closer and closer inviting one's fingers to feel the edges, steps, surfaces, and look over every square inch.
My aim for these tables is for them to be a way of "education" of the craft to the audience of my area. There are plenty of woodworkers in the Minneapolis area but I can hardly even find any what I would call "proper" stock around here. There are no big specialty lumber yards selling fine woods of the world and dedicated reps that speak the same language of lumber. The few yards around cut and dry for "efficiency". Anyway that's another topic but the material is the start of it all.
One of the reasons of doing the production is to lower the cost of the products thereby hopefully reaching a wider audience. The keys are the same though... proportions, grain graphics, wood choice, color pairing, friendliness, subtle lines, surface prep, finishes... Overall, intimacy and sensitivity of eye, hand, heart, and this lovely material. I want to perhaps introduce some lesser known species and maybe give a different angle on common ones.
Some people have started to take notice on either coast but I don't know that it has seeped into the Midwest quite yet (the lack of material can be evidence of a certain kind).
If I build it, will they come? ha
Wednesday, August 19, 2009
Cabinet in Chinese Elm
"Our students continue the quest for excellence - dangerously at times, and often with great sacrifice. But they are on the verge of achieving their primary aim: making a living by making fine things and through the making finding happiness." - James Krenov, With Wakened Hands
Though this piece was finished in April I just relieved its photos. Measuring 35" tall by 36" wide it is made of Chinese Elm, European Cherry, Western Maple, Japanese Maple, Ornamental Maple, and Boxwood. The inspiration for this piece came from a particular plank and an idea of a tea cabinet. I decided early on that I did not want to call it a tea cabinet because it doesn't have to be. It can be used for what ever one desires. This cabinet is for sale and the price will be much nicer before it finds a gallery ;)
Photos of the Big Leaf Box coming soon I hope!
Saturday, August 15, 2009
stop and go
Work continued on the frame. It took me a while to decide what to do with the panel as the lid of a box like this is usually the focus. Apparently I didn't take any more photos in process, but here are a pair of mortises made at the router table with a 1/8" straight bit. The panel is actually a pair of slats that join the frame at the short sides but do not touch the long sides or each other.
Here we go. This is one of the bits I've been waiting for. It's a straight 3/4" bit with radii on the corners. This is the 1/16" radius, the other I ordered was not acceptable work for me... uhhh... so upon word from Ian I tried doing one myself. Turns out it went better than I thought. However, mine isn't as clean as the one I had machined but before I use that one I'll spend some time cleaning it up.
After picking up my one bit I stopped by a Woodcraft store which was on the way home to look for a cheap bit I could try to modify. Some things just escape me, like the lack of simple tools that are very valuable to work. It seems to me that with all the beading router bits out there people would say "hey, a round in the opposite direction could be nice too!" but I guess it doesn't happen, not very often anyway. Also, I am a bit bias, but how many woodworkers have never heard of Krenov, here in the Midwest anyway. Even the people working in the industries. I felt that way before going to IP but after it's usually a bit of a culture shock. The people at the store didn't understand what I was trying to do, and asked me why I would do it. I didn't quite know how to answer besides saying it gives you a nice little profile.
This is it. The profiled tongue to fit a groove. I feel it's much more pleasant than a hard right angle or those raised panel shaper profiles, at least for a project this small.
It seems to be common for me to be looking for this that don't exist or that are no longer are around heh. I don't think these quests will end any time soon though. Infact that is part of the reason I took a more "serious" look into woodworking. A number of years ago I was in the market for a new drum set. I wanted one that done in a way that wasn't really being done. So I took the plunge and made it myself.
Anywho back to the box. Pre finishing. It's getting the shellac and wax treatment. The inside of the box got 5 thin coats of blonde shellac 1 wax. The lid frame got 3 coats orange and 3 blonde, also 1 wax. The bottom panel and lid panels got nothing but one coat of wax.
The real assembly! Now everything is stuck.
Clean up that proud joinery via bench and block plane.
I don't even want to imagine the kind of headaches I would get without my bench. It took some time and money but I'm very glad that I have it and it works!
Not too shabby, alas I am a bit halted again. I need a couple carving gouges for a possible "pull" on the lid. I went to a local carving shop and wasn't quite satisfied with the tools there... So I will probably order some, hope they are in stock, and have to play the waiting game again.
I would have liked to finish the box completely before moving on but I may be moving on to mocking up the End Table of my proposed "table family".
Friday, August 7, 2009
waiting...
Joinery has been done, now it's time for this box to get some grooves. Dry assemble the box then flatten the bottom (and top if desired) before you get to the shaper/router table. The dovetails didn't happen to line up very well for me so I had to use the "double stop drop" method. I used to cut my joinery more based on the grooves that were going in, that was at MCTC where we used an overhead router for stopped grooves. I really did not like that machine so I tried very hard not to use it. I found that the normal table is much more comfortable for me.
Grooves acomplished. The bottom will trap the bottom panel and the top one is for the sliding lid.
This is where I have gotten very frustrated... I lack a router bit that I need to make the bottom panel. It's not just any bit though, I need a straight bit modified. I visited a couple places that said they wont do it and was refurred to one who would. The problem is I haven't heard anything from him in at least 2 weeks >:( I emailed him again, gave him a call and left a message. Nothing. So I "stalled" on the box for a couple very frustrating days. Nothing like being helpless to work due to poor customer service.
Before all that I found a little piece of Sycamore that I hope will work for the bottom panel and lid panel. It has colors that range from a bit "dirty" cream to pinks.
Still stuck without that router bit and I'm getting stir-crazy and about ready to start punching myself in the face for fun. So I decided to work on the lid frame. I normally don't like to do something like this until the box (or what ever) is assembled. But, listen up Craig, I left myself extra breathing room in the demesions of the lid ;).
So here using the band saw with that new bi-metal blade to cut the open mortise.
And here are the tennons after shoulder cuts on the table saw and lots of test cuts to get a close fit off the saw. You can see the the blade is cutting pretty clean though all those little teeth cause more heat so I'm getting some burn marks.
This frame has three different sized parts so I needed to take extra care not to cut the right piece the wrong size!
After a little bit of fitting, here is the rough frame dry fit. I don't really know the size of the tenon, I didn't really measure. I just drew marks that looked good to me but I think it's somewhere around 1/8" thick, more little joints!
Well, I'm still stuck without a bit... waiting, I'm sick of waiting!
Subscribe to:
Posts (Atom)