Sunday, August 29, 2010

Cabinet Sides... more frames

Moving along to the cabinet sides. They will also be frames with glass set in them, however these are flat and square which made life easier with them! Above, "the spectator sport of free-hand mortising" with no one to spectate heh. I'm using 3/8" thick mortise and tenons in these frames. There's little reason to go with twin tenons here as the sides are fully supported in the cabinet and there's enough width in the styles.
I'd rather not go back to an x-y table until I get get a REAL one ha but if I'm in a bind I can make do with my plywood one.

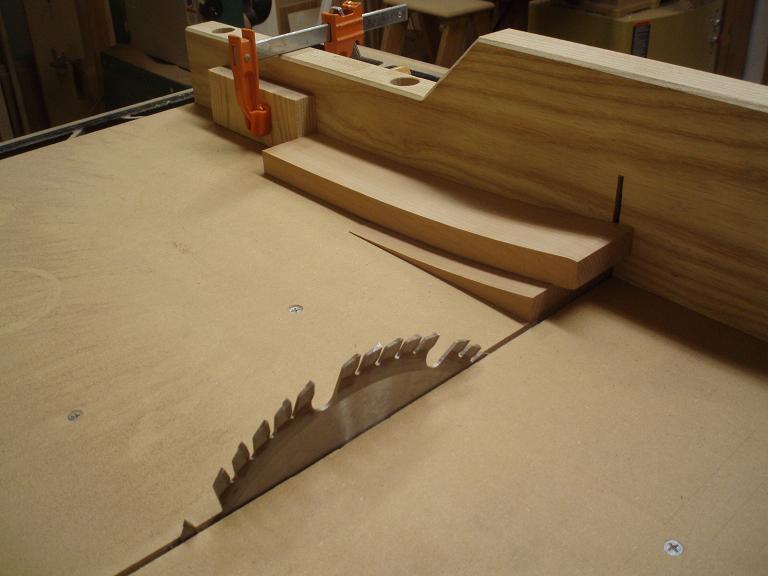
Tenons are cut slightly too large on the table and band saws.

Then round over and trim/file/sand the tenons to fit the mortises they will be joining.

Because I cannot count on precise cuts with the tables saw I have available I have a little extra work to do. Even if you DO have a nice saw there will probably some clean up to do on the shoulders. I just have to account for a smidge extra in my measurements to be able to get a clean shoulder using my chopping block. Handy things they are.

Rebates made in the back of the frames for glass and more rounded corners to chop square.

Fast forward the edge treatment and pre-finishing the side frames are glued up.
Whilst glue was drying I started on some lumber-core for the top and bottom of the cabinet. I have a little mixed feeling about building lumber-core at the moment, but we'll see once I get them done. Thing is it's tedious, time consuming, and dusty on the band saw if you don't have dust control like myself. I like it because you can do things with it that you just can't do/would be a real pain with plywood such as tapered/curved parts. It is also an "old school" way of making substrate and doesn't use the nasty adhesives that plywood does. I'm using Poplar also so it's relatively light, stable, and is a fast growing tree.
Ha one probably doesn't have to make as small strips as I did, perhaps next time I'll make them larger.

Ok back to the frames, the doors. Before I get going TOO far on the substrates I have to know pretty exactly how big the cabinet will be. I came back to the door frames to make the overlap where the doors will meet, you do have to plan this from the beginning.
Done on the router table with a modified bit to give a nice little round on the inside corner. Because the styles are capped by the rails which are end-grain to the router operation, REMEMBER to use a backer block when finishing each pass! I don't want chips flying out of these nice doors!

The overlap may look about equal here but the styles are set back 3/32" from the rails. So the majority of the overlap seam is thicker at the back and thinner towards the front. I don't like the idea of a cavernous divide ha. So if there's light that shines through the meeting of the doors or when opening the doors the "back" will be right there giving a more delicate overlap with a hardier backer.
Perhaps this is a lot of thought about a little detail, but that's what this kind of craft is about :).

Boy, this seems to be taking me some time to do. I suppose it's because I'm usually using "solid" sides. Cut the plank of wood, or make a veneered substrate and go with it. With these sides each has a number of joints, rebates, lines and details that need to meet up. Now that they are basically done I can start building the cabinet like I only started working on it a couple days ago HA!

Wednesday, August 18, 2010

Showcase Doors

Boy, these doors are taking me some time! Though the doors arguably being the most important part of a cabinet, I guess it's alright. That and the fact that these are curved frame doors, which I've never done, with glass "faceted" along the curve, which I've never done, with a compounded curve the to top rail, which I've never done, all using stub tenons including baby twin tenons, which I think take a bit more time than slip/bridal joints. HA! Well why not do it all the things I haven't done before at once!? hmmm
Anywho, The joinery for the frames are done. As I may have mentioned I made the styles (vertical pieces) a bit thicker than the rails (horizontal pieces) which can be see above. This was to allow for any wiggle room when joint making. Just hand plane them flat and "planer" to the rails and one can move on.

Now time for probably the most critical part of the whole cabinet... the rebates for glass in the curved doors. If the doors were flat, this would be relatively straight forward, but no. Curves. ha
Before going at this I read through the Showcase section in JK's Impractical Cabinetmaker where he talks about these doors (minus the compound curve). Though I found the pictures a little vague/not of the operations I was looking for. JK didn't have the flexibility of an online source though so it can't be helped. Hopefully what I have done here makes sense heh, made sense to me anyway, maybe others can think of easier/better ways...
Make a template. I'm sure there's more than one way to make more than one kind of template. I used some scrap 1/4 plywood. I drew exactly what I wanted on the plywood. Rough cut it with a band saw, then defined the template precisely by hand and chop block.

JK wrote about making a whole jig for holding your template to the work, I opted for a lower tech option, partially because of the curve in my top rails I wouldn't be able to use the holding jig for 2 of 4 pieces anyway.
Using a router template guide bushing I first set the template close, but not quite the bushing thickness passed my rebate lines. Made a pass with the router and slowly tapped my template back till the bit just skimmed the lines.
I was able to cut full depth of the rebate (3/16") with this set-up for the flat bottom pieces. Not the top curved ones.

Now, before I came to this conclusion I had racked my brain trying to come up with some sort of jigging to cut the curved rebates in my curved rails. I got fed up with trying to think of a jig that would make a clean finish cut and knew that I could get close then finish by hand by the time I may think of a jig.
SO I used the above template to start the rebate and to hit my rebate lines exactly. I could only make a straight cut with the above template set-up (straight rebate but varying rebate depth due to visual curve).
I took the template and bushing off. and set the curved rails up side by side (held to the bench with double sided tape LOVE THAT STUFF) for the router to stand on. The concave curves allows the router base to always have two points of contact along the curve (4 points counting both pieces) thus giving it stability, and the ability to cut a smoothly curved rebate "bottom".
This may be a little brow-raising to most but using the actual pieces as aids is something I have done a number of times before. Everything is exactly as I want it, why make and try to duplicate shapes with scrap wood when you don't have to!? ha.
I changed the bit to a smaller diameter so I could better see what was going on. Now, just free-hand route as close to the already exact starting point as one feels comfortable down to finish depth.

That resulted in a little bit of material I needed to clean up by hand to hit the desired line.
Then make the rebates in the styles with standard router table and chop the corners out of the rail rebates!
Phew! It seemed to have worked out, though I don't have glass to put in yet heh.

Now, I want to get the doors all glued up before moving on too far with the cabinet. To be able to do that I had to do some finish prep and edge treatment on some parts because these are frames and other parts because of the steps I've made between frame elements.
Above is the bench during edge treatment. Using a number of techniques depending on grain the edges are applied to. Block plane for long grain, files and paper for end grain.

So here they are, dry-fit with all the prep needed to do some prefinishing before assembly. Soon it will be on to FLAT pieces for the rest of the cabinet!!! ... until I get to the stand ha.

Monday, August 9, 2010

Where's the flow?

Hey, I'm still alive. Just haven't been able to create a decent work flow lately. Working more hours at the other job to "make up" for time off, it being so hot and thick out here that it's a struggle to move, and problem-solving for these the cabinet doors racking my brain... alas a little relief with some good work done.

Above is a "book-matched" pair of air-dried Maple I got locally about this time last year (crazy to think a year has gone by). I cut some of this maple up for my table tops... kind of wish I hadn't because once again I'm calling it close for usable material. The tone of this maple is lovely, a much more "buttery" color than commercial Maple and a creamy texture. This is my Cabinet material.

I work at the door rails first, in my opinion the most important pieces for this cabinet. I haven't cut anything else at this point. If for some reason one of these is to not work out I need the next best selection.
A lot of the time these kinds of doors are made using bent lamination but it being Maple and with the end grain to be used as aesthetic features I don't want all those seams... also I just wanted to use solid material.
Note the nice curve of the grain accentuating the curve of the pieces because of the way arranged the cuts. Also the stronger grain curve on the top piece that will work well with the shape to come.

The outsides were shaped first, the the inside cut.

Save the off-cuts of the outside shape to use as supports for further work with the components.
I used spoke shaves for the inside shaping. Don't forget to keep things square! (that is if that's what you want)

Using those off cuts again. Cross cut the pieces to size on the table saw.

Here is the top rail with another curve introduced. I originally made the rails about 5/16" taller than they need to be so that I can get 3/16" thick strips to use to hold the glass in place.

Door joinery. This was one of the things I was losing sleep over... what to do. Most of the time one would use slip-tenons (aka bridal joints) BUT because my bottom rail is so tall (2-5/8") I didn't feel it was appropriate aesthetically and mainly due to wood movement potentially breaking/weakening the joints. I can get adequate stub tenons in the outer styles but the middle ones are pretty narrow... particularly the right side because of both the rebate for glass and lay-over for the meeting of the doors.
I came up with a couple options and was wanting to lean towards small double tenons but felt that they may be too small. After sleeping on it (or trying to) I reasoned that the middle style joints aren't baring a whole ton of load. The outside corners, where the hinges go, are going to be the real load bearing points. I think these double tenons will be quite adequate.

Wednesday, July 28, 2010

Showcase Mock-up

Things almost always want to change between 2D and 3D. This is one of the main points of mock-ups for me. When I did a full-scale drawing I already took off an inch here and there. When I was putting this mock "together" I took off a 1/2" here and 1/4" there. I felt some of the frame members needed to be wider to support adequate joinery... particularly the vertical frame members of the doors in the center of the cabinet. I typically start the mock a bit heavier than I think I want it because it's easier to take off material than add heh.
I am a little worried about the size whether justifiably so, or not.

Here's a photo to get a better idea of actual size... I'm somewhere around 5'8-5'9". Keep in mind me standing in front of the Mock-up makes it look a little smaller than it is. Oh yeah, the height that I have it sitting at is the aimed finished height.
Though this piece is still small for many furniture/cabinet makers, it is bigger than many of JK's "larger" pieces. Then again, Jim was a smallish man. Maybe he "designed" to his person and I to mine. I do like the feeling and aesthetic of a small intimate piece but I'm also looking for something that may command a little more presence in a show/gallery setting yet still hold a relative humble grace I am fond of... and of course make a great piece for a home. Hmmmmm.

Aaaaaaaand here's a new plane! I've had this guy sitting in different stages of the process for long amounts of time, but it's finally done... except for dressing the bottom heh. It is made of a block of Vera wood that Robert graciously gave me while at IP THANKS AGAIN! It's a new smoother plane. I feel kind of sad when thinking of retiring my current smoother. It has been with me since the beginning of the year at IP (2008) and has served me well. However I have more experience making planes, and plane shapes now. The older one at times got a little uncomfortable. I think this one will be an improvement though I'll be keeping ole Paula (older plane) around just in case... maybe someday it will become a compass plane, maybe I'll give her away, maybe I'll keep it for sentimental reasons heh, I don't know.

Monday, July 19, 2010

Ruedy Key Cabinet

I took a couple more process photos before finishing this little guy but it was just some taping for finish and mortise making for hangers which I snapped on the last project.
I decided to put together a half-assed photo shoot using my drawing paper roll on my bench, lit with shop and bench lights (no defusers). The colors aren't great but that is always a challenge. I'd say some of the detail shots are even website worthy :).
Without further a due -
Ruedy Key Cabinet - A.D. Walnut, unknown, Kingwood.
About 14"x8"x5"


Little "leveler" of Kingwood helps prevent the door from sagging over time.

I really like this shot, don't know what it is... just nice.

For how much the door is curved it is very difficult to photograph. I mean it's not WILD but a more obvious curve than the Vanity Cabinet. This shot illustrates the door shaping that is even harder to photograph. The "whoop-dee-do" of the door and the shaping of the cabinet side act as the door pull. The Groom has big bass handling hands and the Bride slender hands, figure this is not only a nice detail but a more versatile pull ha.

Key Hanger also of Kingwood (so it the flipper-flopper).
The hangers are a bit "rougher" than the rest of the cabinet. I don't know, I'm coming to like the imprints of hand tools on these little pieces. Problem is, I'm not a great carver. The "freedom" of work on these little guys aren't exactly congruent to the overall flow of the rest of the work but I hope it's not too much of a clash. The journey of one's aesthetic continuous heh.

The other shots weren't showing the shape of the partision so here's one that does.
The partision has a concave shape to allow easier access and visibility to what may be in the space below.

"Left over" wall hangers from the Vanity Cabinet were nice to have on hand :).

The "seal of approval" heh. I don't give ANY thing I make the little "NN" carving. Call me vain or silly but it would be nice if some day this little mark would be an indicator of quality and craftsmanship to some out there. I guess it comes to the yearn for some sort of "greatness" in me. That driving yet sufferable force. A pursuit of "excellence".
So this is my gift to you. It may not be large or "grand" but it is built to last and flows from overall form to the details. Honest hard work and perseverance from the hands working with the material making friendly forms, edges, and transitions. I hope you find your bond shares more in common with this little structure than one may first suspect.

Tuesday, July 13, 2010

Partision & Back Frame

As Mentioned last time, pre-finishing! Using air-dried Walnut I want to show off the natural colors and tones of the wood that is quite different from the Kiln-dried variety. I hope that in some small way I can raise awareness and promote the appeal of air-dried material. The wood left to its own devises is really in its top form.
Anywho I chose "orange" shellac for the Walnut as it helps along those deep chocolate tones but doesn't mask the subtle gradients the way oil might. Four coats this time with one light coat of wax, still a minimal finish :)

The carcass glued up and working on the partision. I cut the partision to approximate size (meaning still too big to fit) then I shoot the end grain with a block-plane to fit. I am fitting from the back because there is an ever so slight taper to the carcass that I built in for the purpose of fitting this partition. The riser blocks are there to support the partition at the height that it will live. There could be slight variations in width of the carcass along its height. Always fit your components where they will end up!

The partision fit and being finished I had time to address the hing mortises in the door. After the partision was glued in I fit the door too.

The back frame. Walnut from the same plank. 3/8" thick. Here I was fitting the partision "backer" again with shooting board and block plane.

Searching for that back panel! I'm using a cut of that Mystery wood I used as the bottom of my Arbutus Box from IP. Still don't know what it is, but I do know that its difficult to work with, its attractive, and I don't have much of it. A precious bit of wood... my friend better appreciate it ha.
I normally stray away from book matching but the colors wouldn't allow a slip match. I looked at a flip match but felt it just looked hokey like it was obviously fighting that book match... so I just went with it. The prismatics of this piece really isn't an issue so it turned out just fine.

With the softening details done to the frame and panel, pre-finishing done, it's time for glue-up. The partision backer is doweled and the frame uses slip-tenons aka bridal joints. Remember to clamp those tenon wings together! Particularly with these thin joints the moisture from the glue can do funny things heh.
The panel looks a bit funky with the unfinished Walnut, but when the frame is finished... you may not be able to take your eyes away hehahehae. but seriously, it should be nice.

This is turning out to be a quite small and simple but lovely little project. It's one thing to be able to do a great, impressive, technical, "grandiose" piece which is all well and good, but it's another to work on a modest scale and be able to make the project your own and to make it live with its own "personality" :)

On the topic of "more grandiose", here is a shot from my sketch book... I've never claimed to be a drawer heh. I think the top cabinet with the legs may be my next project. Standing at about 5' tall it will be a display case on a stand. I would be lying if I said that Rene Almon's Euro Cherry cabinet in Waken Hands didn't affect me. I made this sketch months after seeing Rene's cabinet, I wasn't even actively thinking about that cabinet but it left its impression... After doing a preliminary scale drawing I looked in Waken Hands again and found it to be within 2" of the same diamentions! GAH! Well there's no use fighting it ha. I'm not going to purposely uglify my work just to try to make it more different. It already is a different cabinet besides the fact that we are two different people and will see the details in different ways.
The sketch under is one I would also like to peruse on a stand. Obviously I was affected by JK's walk about cabinets ha. As similar as it may be in "genetic make up" to JK's I think that even in the sketch it obviously shows my "persona".
Currently I'd like to see it some Cedars, but don't know if that soft of wood would be a great idea for a walk-about..?
Back when I started this whole woodworking thing I used to get caught up in trying to be unique. Did that produce really great and fine work? I don't really think so. At this point in the "evolution" of furniture/craft/whatever there doesn't seem to be a lot of "firsts" left. Now most of the "truly unique" stuff out there "truly suck" ha. That isn't to say that there is no room left but why fight what is great work? If I happen upon something "out there" that I'd still be happy with I wont hesitate to do it. I'll just continue to try to do what I want to do, make great, livable furniture and cabinets :).

Monday, July 5, 2010

Gah! Other responsibilities kept me from laying a finger on this project for four whole days... was getting a bit edgy about it ha. But I now have pieces in a gallery in Northeast Minneapolis and am "making up" for time off the part-time gig for Toronto.
Anywho where was I?... Ok after getting the carcass dry fit with dowels one should address the back of the case. I used a block plane and my bench to check for flatness/planeness(can that be a word?) of this little guy.
Then to the router-table to make the rebates for the back frame. The vertical pieces on this cabinet are routed through but the top and bottom need stops, shown above. Nothing fancy, just scraps and clamps.
I'm planning on my back frame to be 3/8" thick so I make the rebates about 7/16" deep to allow a step from the back of the carcass to the frame.

There's a faint line that marks the rebate of the vertical piece. I always leave a bit of material for making the final cuts/fits by hand. Squared up the stops with the good old bench chisels.

Grooves were made for the partition by my little trim router. Maybe I should jig my router to able to be able to do this kind of thing but the "guide block" works too.
At this time I also made mortises for hinges, flipper-flopper, and key-hooks with the same little router plus hand work. Also a hole for the leveler on the drill press.

there are the key hooks of Kingwood. The purples in the Kingwood really go well with the violet and mauve in the air-dried Walnut. I mill the hooks together like this because they are easier and safer to work with as a larger piece than individual bits.

A finished key-hook with little live tenon.

Heh a tiny sand "block" with 1000 grit paper used to do a little softening of hardware mortises.
With a final ever-so-light planing of the surfaces it's on to pre-finishing!