Alright. Half blind dovetails, lets do this.
First I start by marking where the joints are going to go and there dimensions. I scribed a line where I want the reveal, or the portion covering the dovetails to the front. Also marked with a marking gauge how deep the joint should go which is referenced by how thick your drawer sides are.
Mark out the patter of dovetails and get sawing... carefully! Accurate sawing really makes the work go more smoothly and therefore more quickly. Saw at an angle meeting your scribe line both on the side and back of the drawer front.
Then go to the chop block. Here it is not in position yet. You can see the scribe line marking the depth of the joint. I use this line to line up the work piece in the chop block.
Here's a "trick". Use a nice wide blade of sorts and let the leading edge fit into the scribe line. Apply a little pressure to keep it steady and pull the chop block against your blade. Tada! Very accurate placement with no fuss!
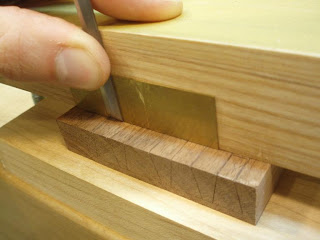
Well now, get to chopping... but wait! Here's another handy maneuver I picked up at IP. I use a little brass shim against the chop block to start my "rough chopping". Just make the initial cuts with this shim then put it aside and keep chopping putting the cutting edge of the chisel where it just was and bracing the chisel back against the block.
The purpose of this is to leave a little to shave off at after the joint has been mainly chopped out giving you a nice clean cut/joint.
Chopping progress.
Now, the inside corner of these joints is where your saw couldn't reach so it will look a bit rough/stringy as you chop out the waste. It will be cleaned up later.
More shims! Get close to your reveal scribe line, I used a wooden shim scribe said line. This is that same wood shim with the brass shim from earlier on top. Same idea, use the brass shim to guide your cut then the bare wood shim for your final cut.
Final cuts with wood shim.
Final end grain cuts using the chop block.
Look over your work. Make sure there isn't anything left to do while in the chop block.
Take the work piece out of the block. It's still going to need some work.
Here are a couple tools I've learned how to make and use. At the top is a small pairing chisel. I mainly use this for dovetail work. It has short, wide-ish blade to be able to comfortable choke up on it and get a lot of control. The blade is also pretty thin in thickness and has a pretty long taper to be able to get between tight dovetails when fitting.
The middle I can only think to call a "detail chisel". I don't use it terribly often but when I need it, nothing else will quite do as well.
At the bottom is a violin knife. Quite handy to clean out corners.
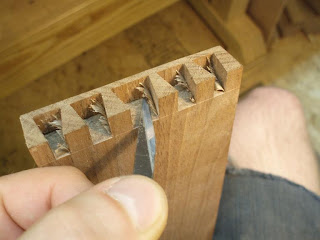
Use the pairing chisel to clean up the rough parts where the saw couldn't cut.
Then the violin knife to cut the shaving out and clean the corners. (This isn't how I use the tool, need two hands, one to hold the work piece and one the knife. Just showing how the tool fits in to cut.)
Check for cleanliness and squareness and address accordingly. Remember, your pins here is what's going to define your tails therefore how the joint looks. Well made pins will make fitting your tails much easier!
The tails side is chopped out much the same except through of course. Fast forwarding that whole procedure here is an almost finished set.
Fyi... Oak is not the easiest wood for dovetails! I feel for the students at IP who picked Oak for their first box project! heh.
Well I am physically and mentally drained from dovetail week as always. Looking forward to wrapping this project up!!! I still don't know what I'm going to do for pulls yet hmmmmm....
Monday, August 1, 2011
Subscribe to:
Post Comments (Atom)


4 comments:
Thank you for the well explained technique that you use! I need to try this on my next DT project... Do you always use the same procedure for all kind of DT?
Thank you.
look at that flair! flare? so clean nick, so clean..
sadly i think im still veneering my fronts...=)
very nice. i recently completed my first set of dovetailed drawers that featured QS white oak sides ... where in the heck were you with the FYI 6 months ago!!
Thanks guys!
David - The procedures for through dovetails are not exactly the same as half blind dovetails but the basics apply. With all the variations out there, there is similarly variation in how one achieves their joints/goals :).
Nick B - Yeah I wasn't feeling the flare so much but after cleaning the sides up today I'm feeling better about it :). It was certainly a bit trickier with the brittle Oak.
Matt - QS White Oak? Ouch how was fitting those drawers? Ha just think about drawer work in Wenge hee hee.
Post a Comment